Set Up Kinetic LED Display With Madrix
How to Use MADRIX Software to Set Up a Kinetic LED Display: A Step-by-Step Guide
Introduction
Kinetic LED displays are rapidly becoming a centerpiece in modern stage design, immersive environments, and interactive installations. One of the most popular software solutions to control these dynamic displays is MADRIX, known for its robust features and user-friendly interface. In this guide, we will walk you through the process of setting up a kinetic LED display using MADRIX software, from wiring to programming, so you can bring your LED display to life with stunning visual effects.
Kinetic LED Display Wiring
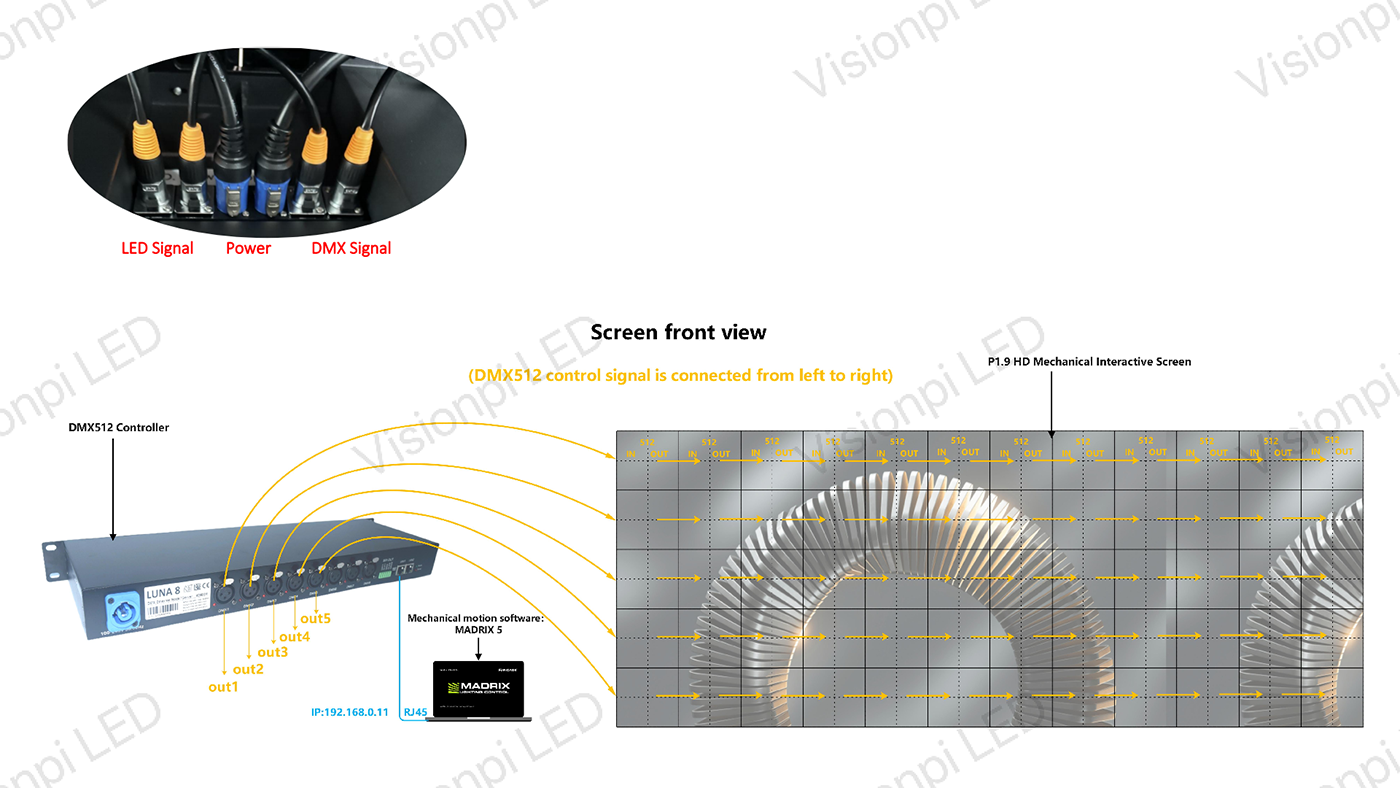
Wiring and Hardware Setup
Before diving into the MADRIX software setup, ensure that your hardware is properly connected.
Required Cables:
– **DMX Cables**
– **LED Display Signal Cables**
– **LED Display Power Cables**
Wiring Instructions:
1. LED Display Signal Cable: Connect the LED display signal cable just like you would for a standard LED display, ensuring proper data flow.
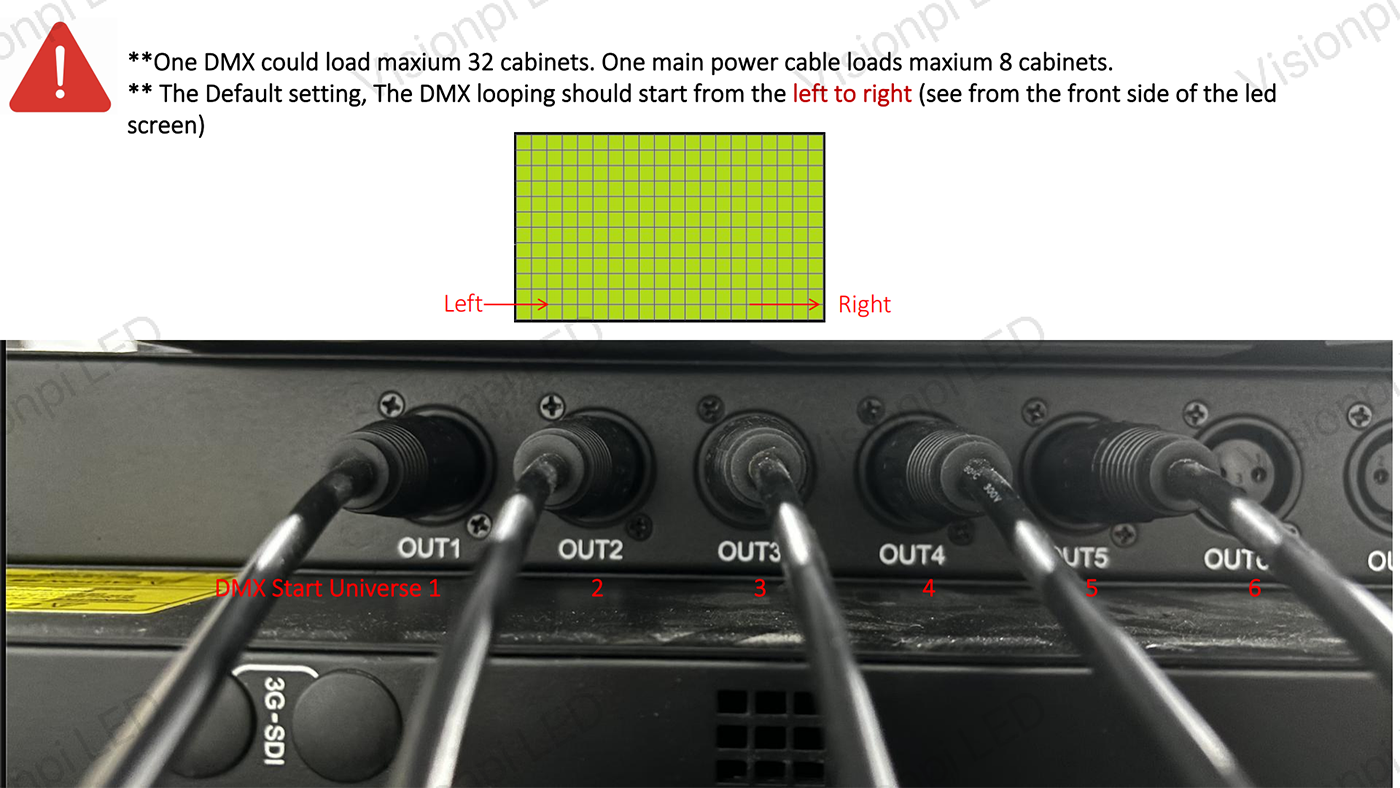
2. DMX Cable: For kinetic displays, the DMX wiring should start from the left side to the right side (from a front view), and from top to bottom.
– A DMX output can control up to 32 cabinets.
3. DMX Controller: Connect the DMX controller to the PC using an Ethernet cable.
Ensure that all connections are secure, as faulty wiring can cause communication errors between devices and the MADRIX software.
DMX IP address Pinging
For proper communication between the PC and the DMX controller, both devices must be on the same IP address range.
Instructions:
– Check the **IP address of the DMX controller** (e.g., **192.168.0.201**).
– Set the **PC’s IP address** to the same range, such as **192.168.0.XXX**.
– After assigning the correct IP addresses, the **green indicator** on the DMX controller should start **flashing**, signaling a successful connection.
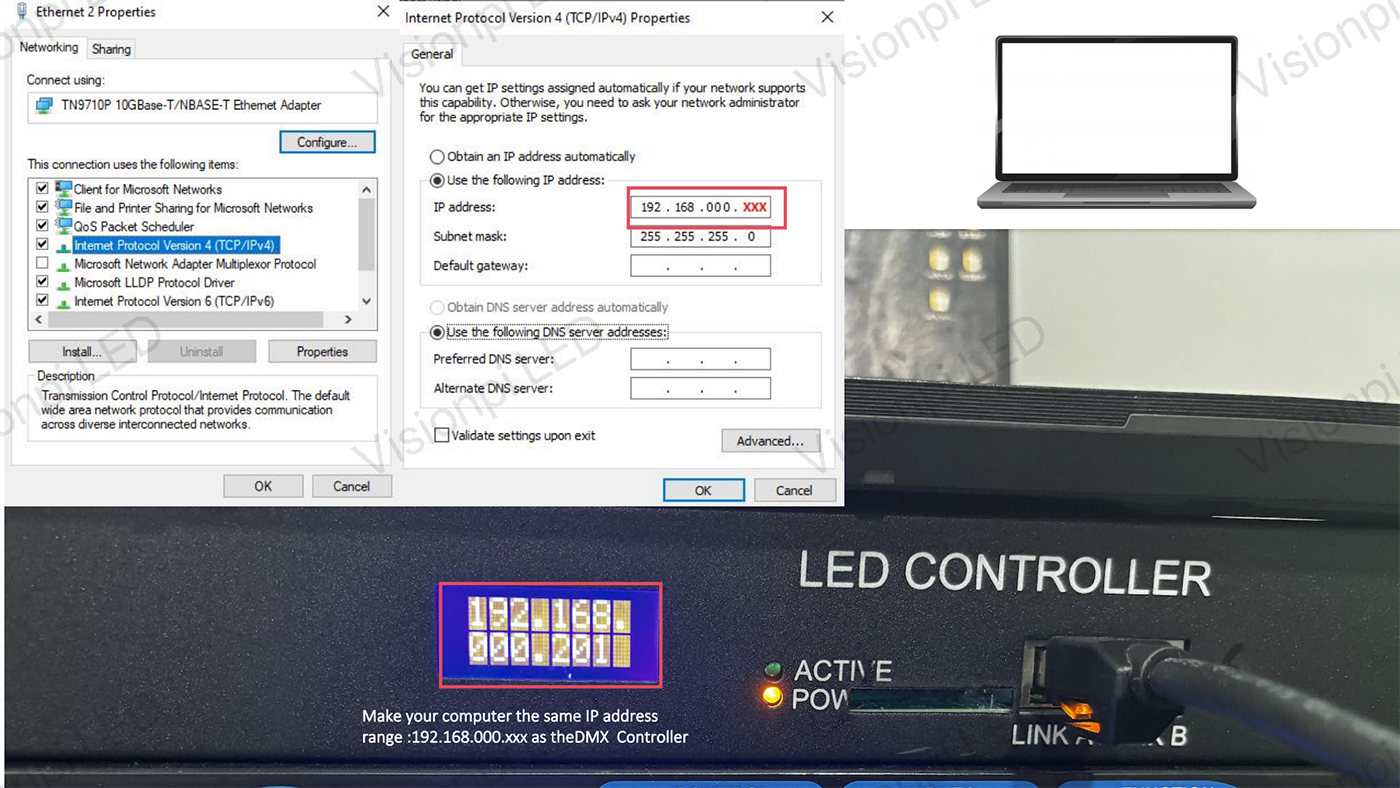
Ensure the **DMX controller’s IP address** and the **PC’s IP address** are within the same range. For example, if the controller’s IP address is **192.168.0.201**, the PC’s IP address should be set within the same range, such as **192.168.0.XXX**. Once the IP addresses are correctly configured, the green indicator on the DMX controller will start flashing, indicating successful communication.
Configuring MADRIX Software
Now that the hardware is set up and IP addresses are properly pinned, we move on to configuring MADRIX.
Installing MADRIX:
1. Download and install **MADRIX** from the official website.
2. Once installed, launch the software and make sure your DMX controller is connected to the PC.
Setting Up the DMX Interface:
1. Open **MADRIX** and go to the **Preferences** tab.
2. Under **Devices**, select the **DMX controller** from the list of available devices.
3. Ensure the device settings (such as IP address and communication protocol) are correctly set to match your setup.
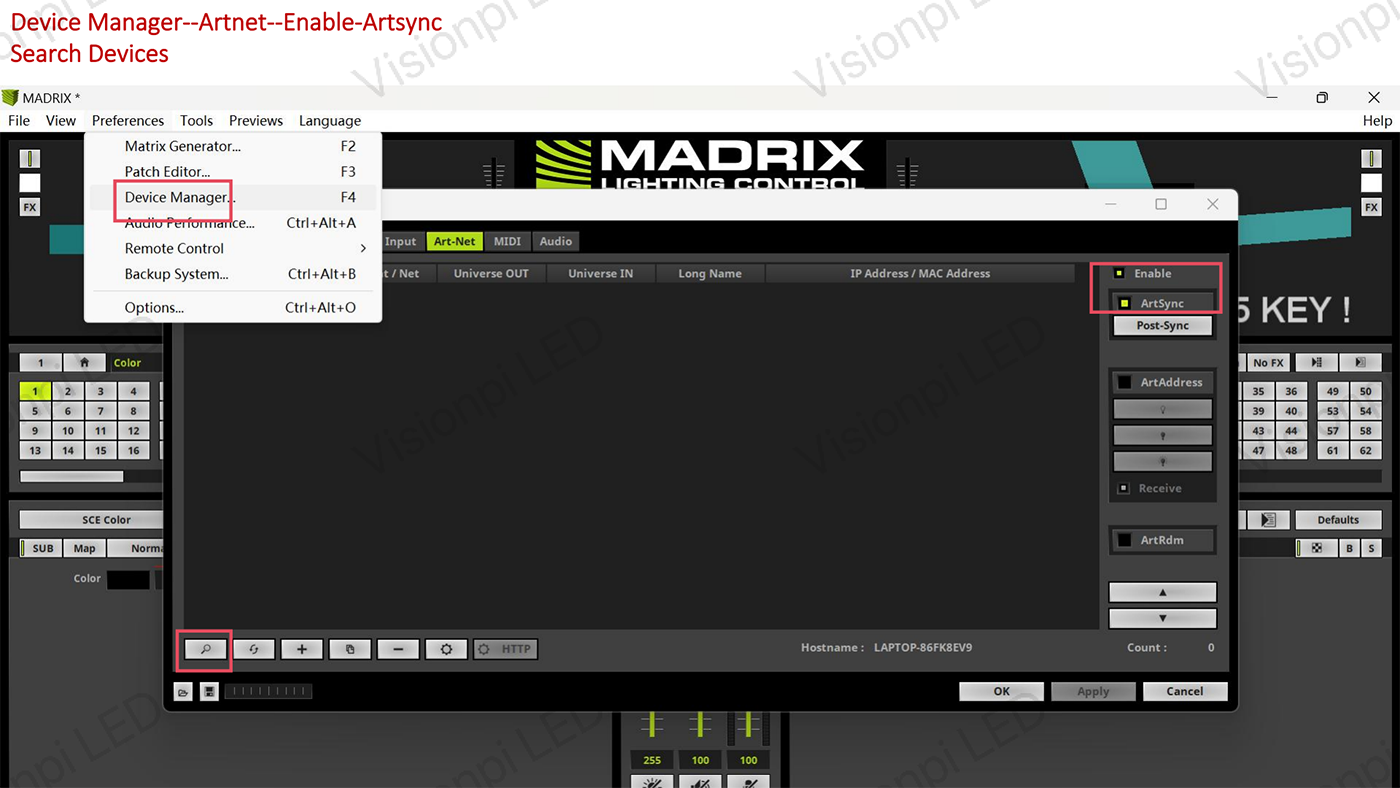
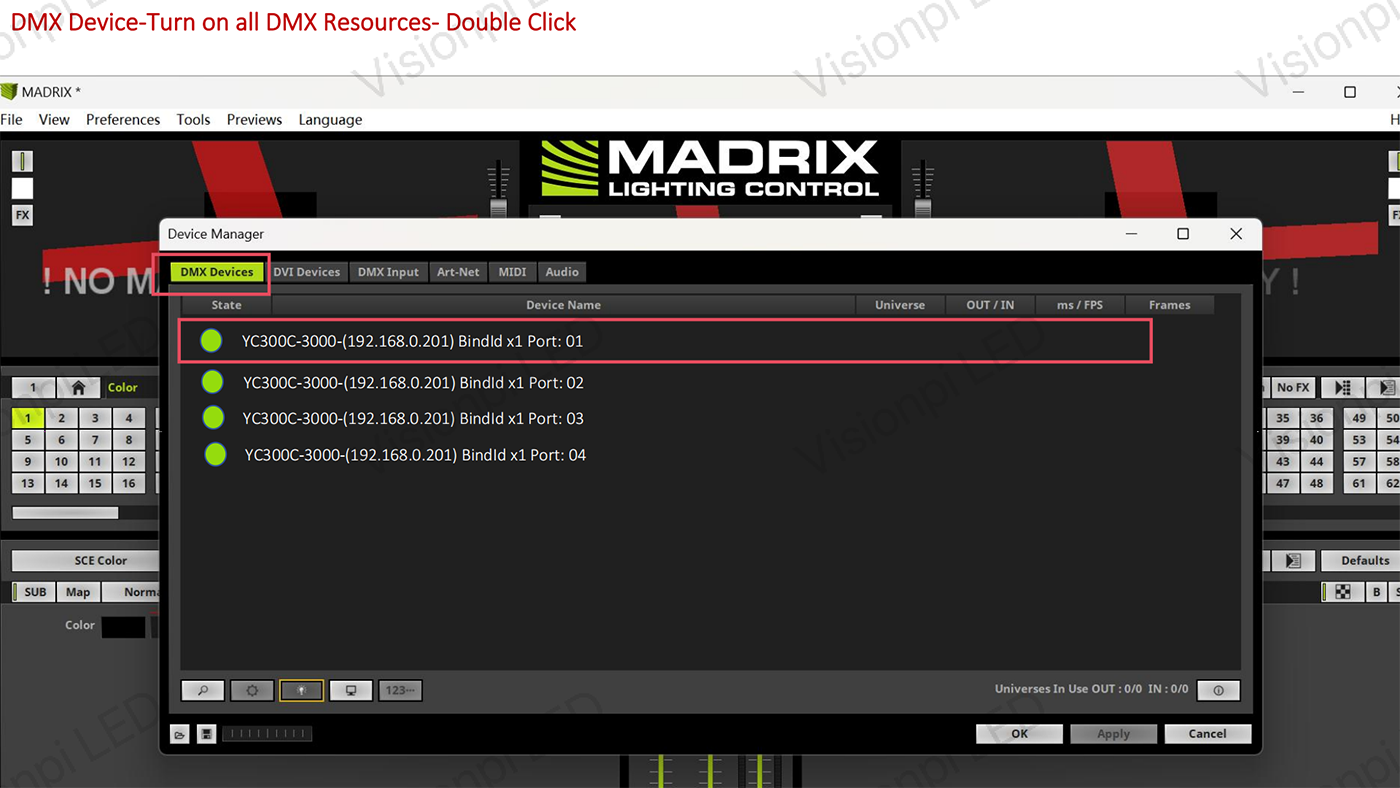
Turn on DMX Resources
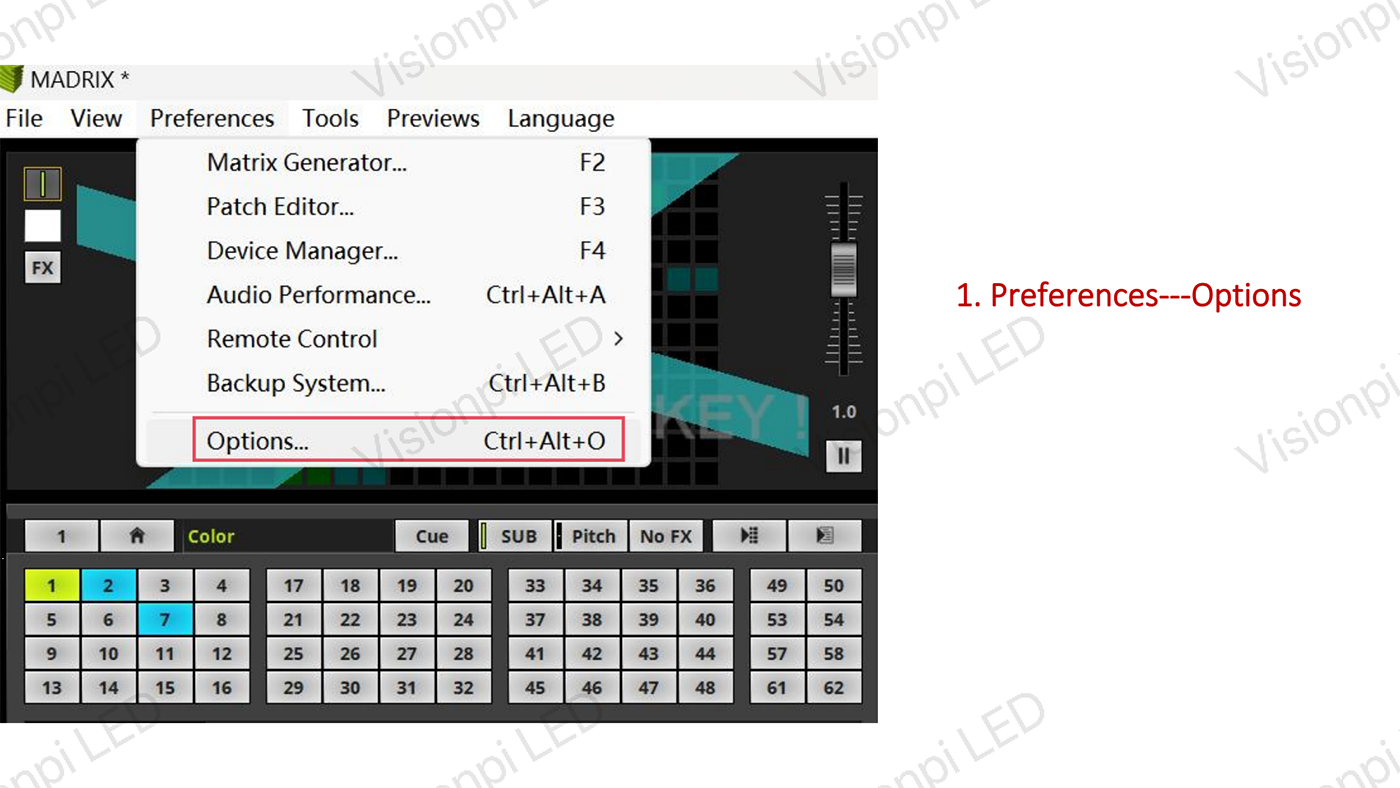
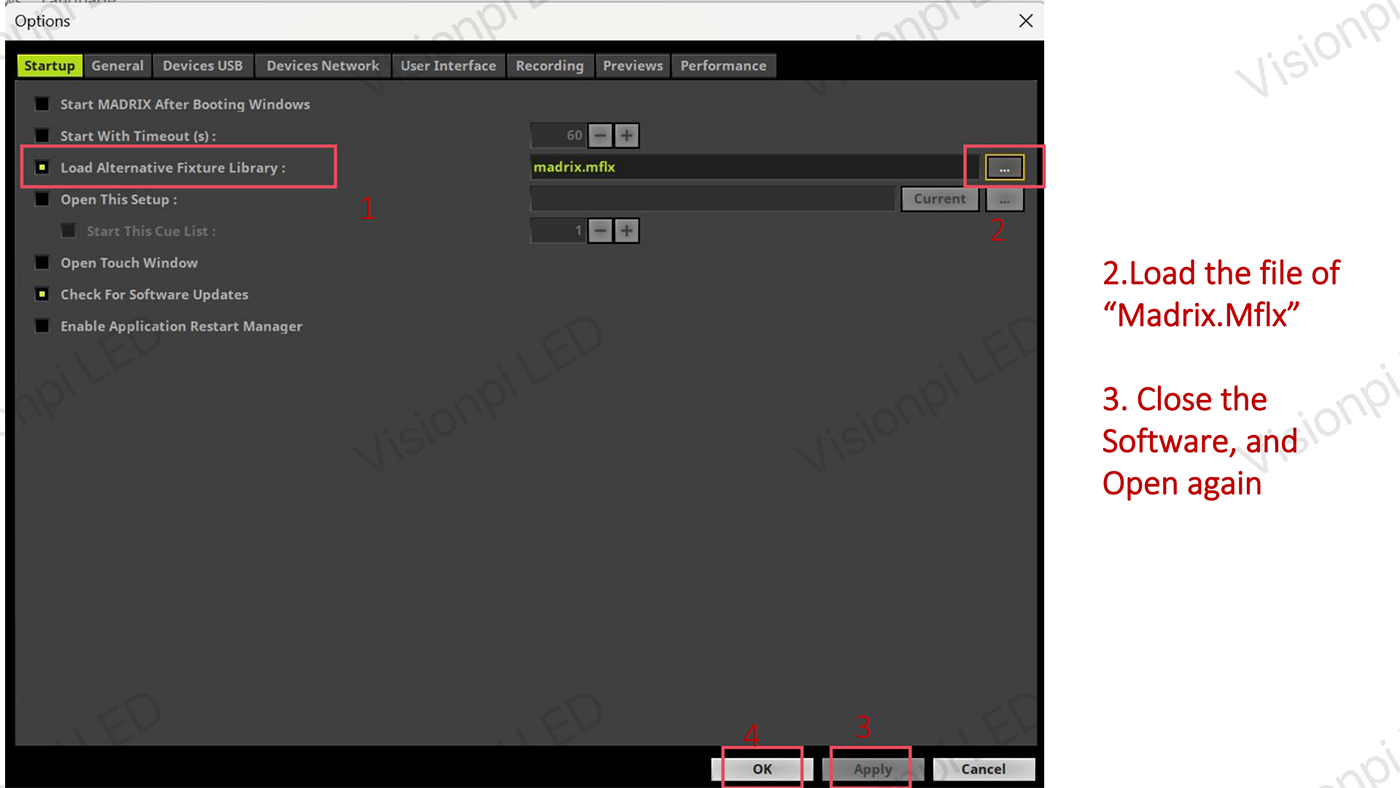
Load “Mflx” File
Mapping the Kinetic LED Display
Kinetic LED displays often feature multiple moving parts, and the setup in MADRIX involves mapping these LEDs to reflect their real-world positions.
Mapping Instructions:
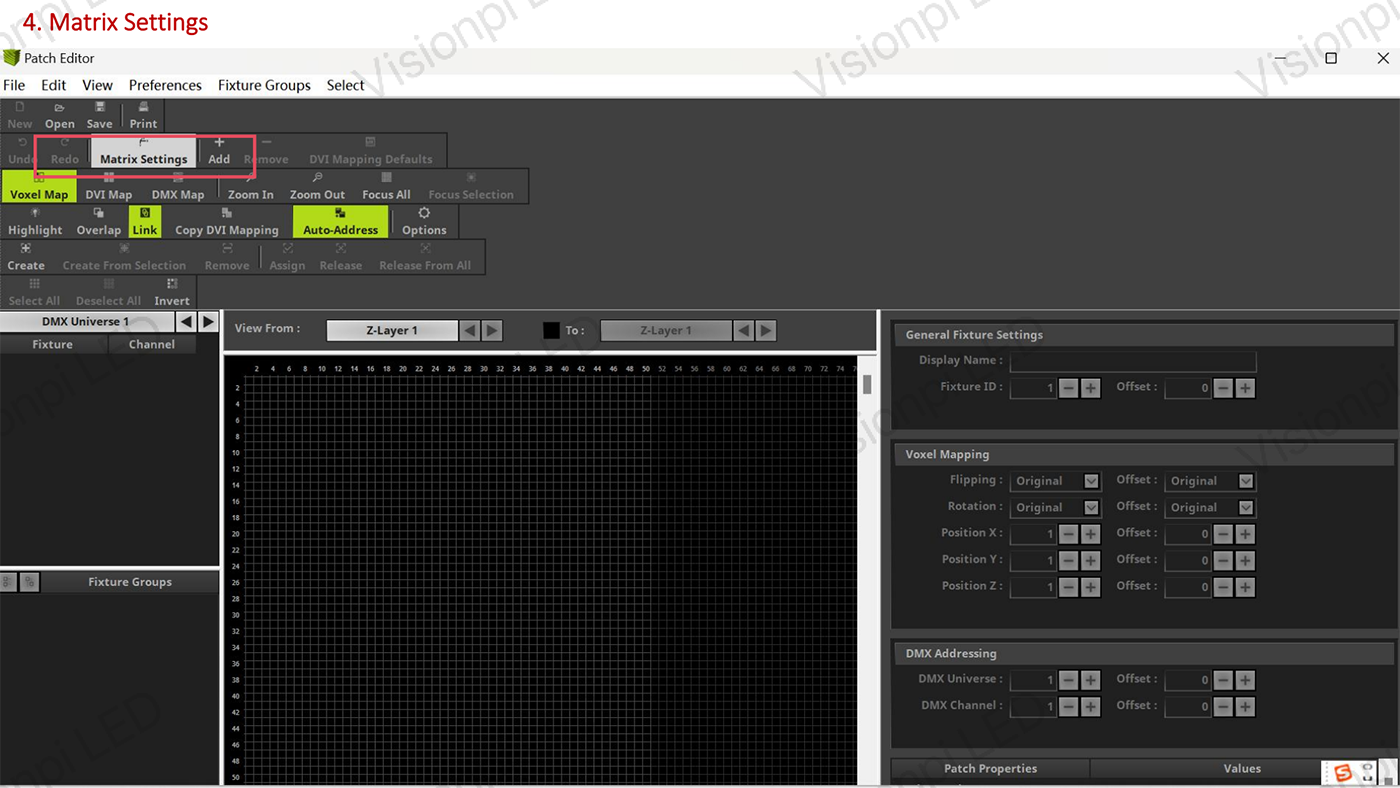
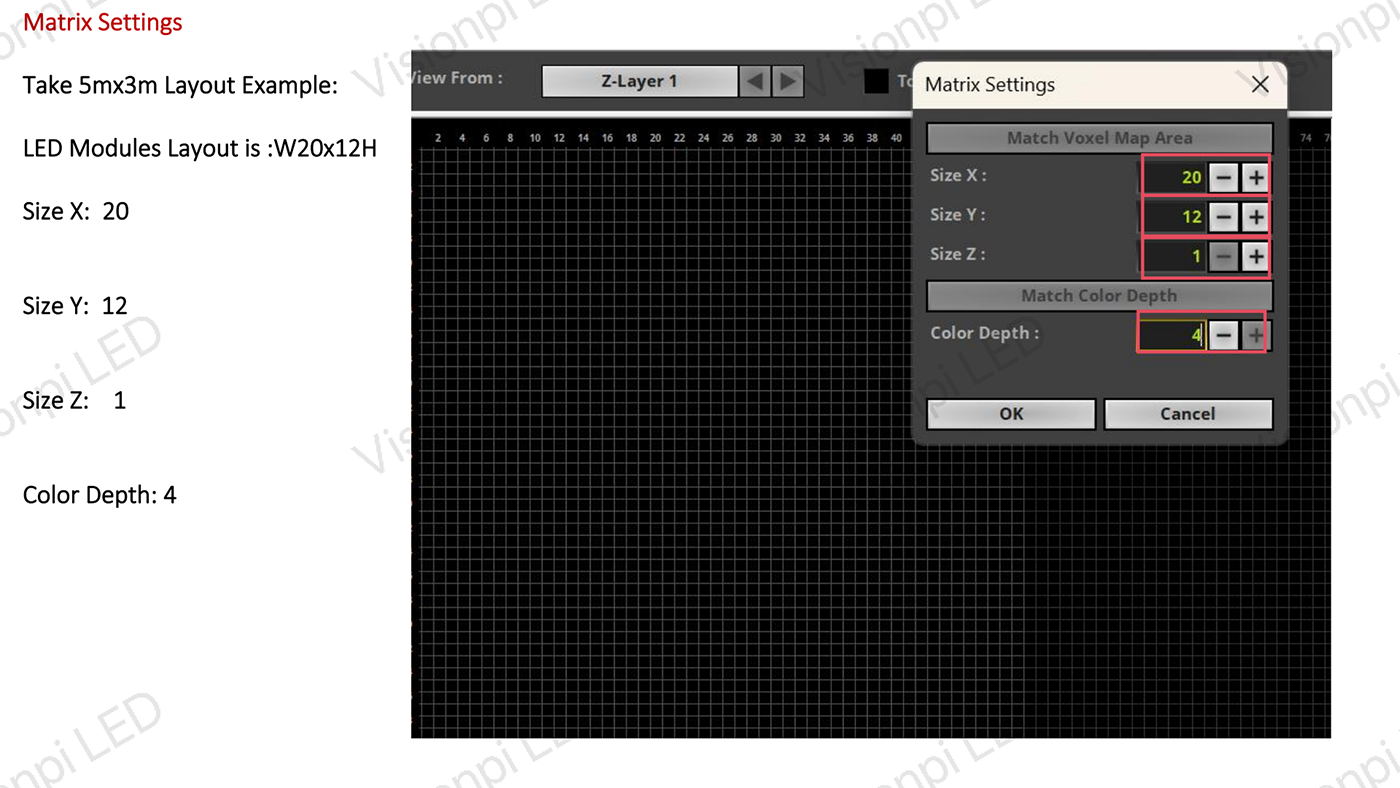
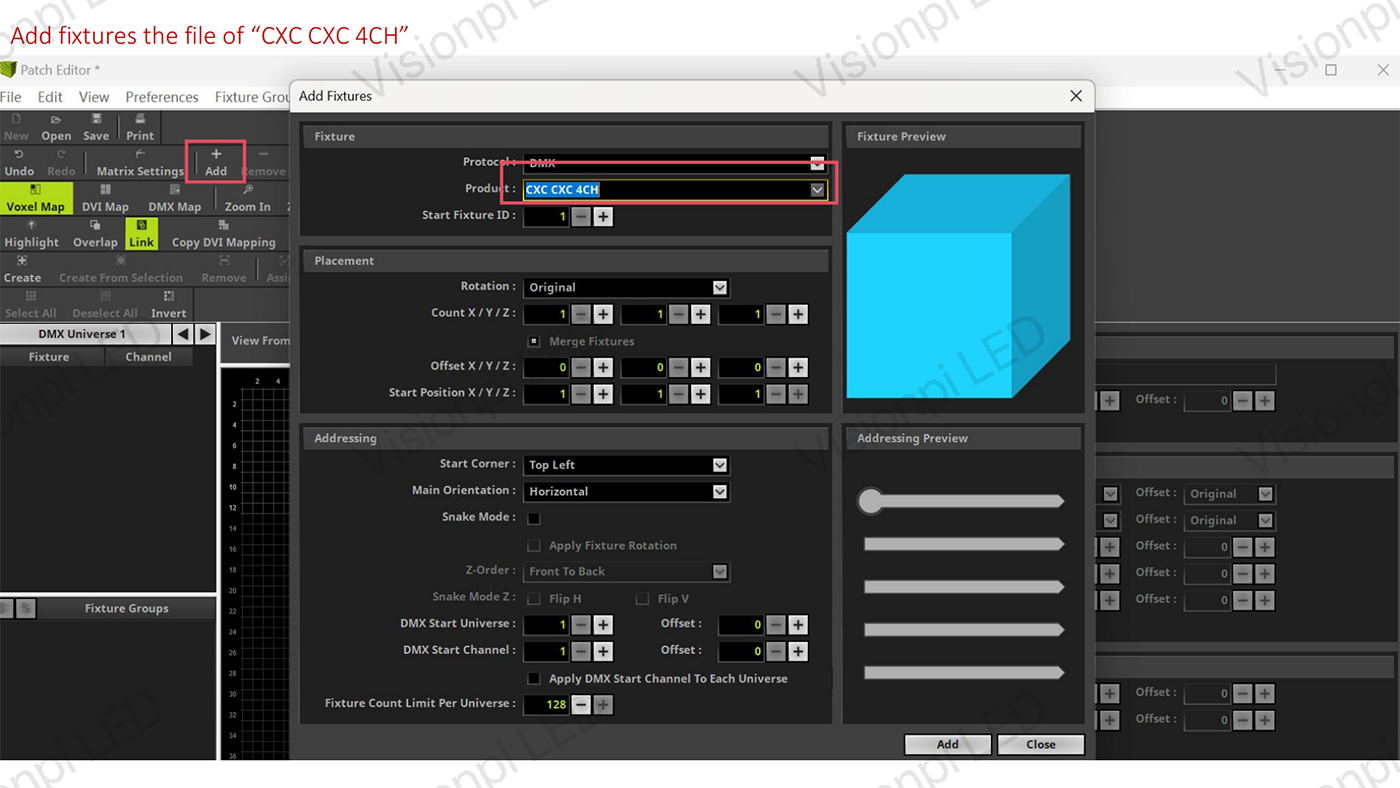
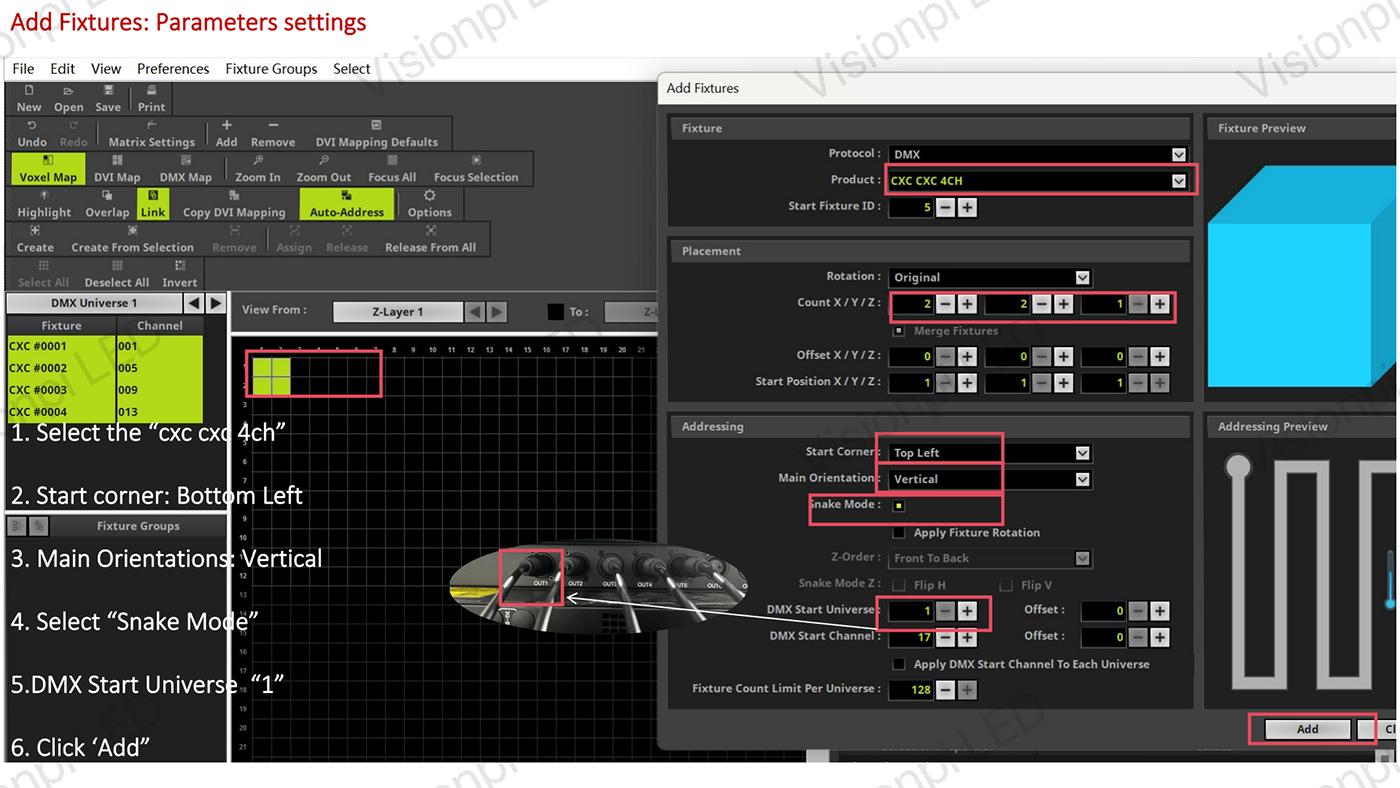
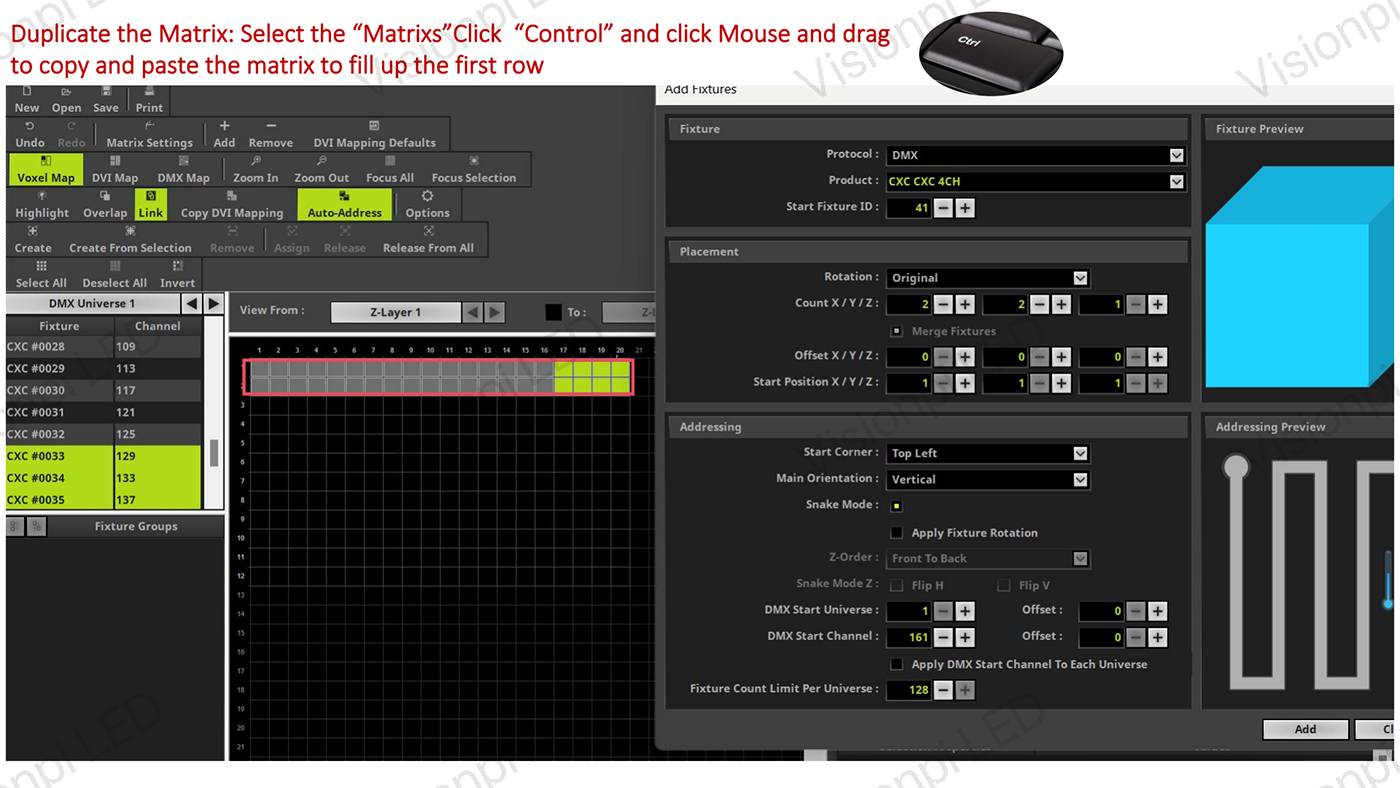
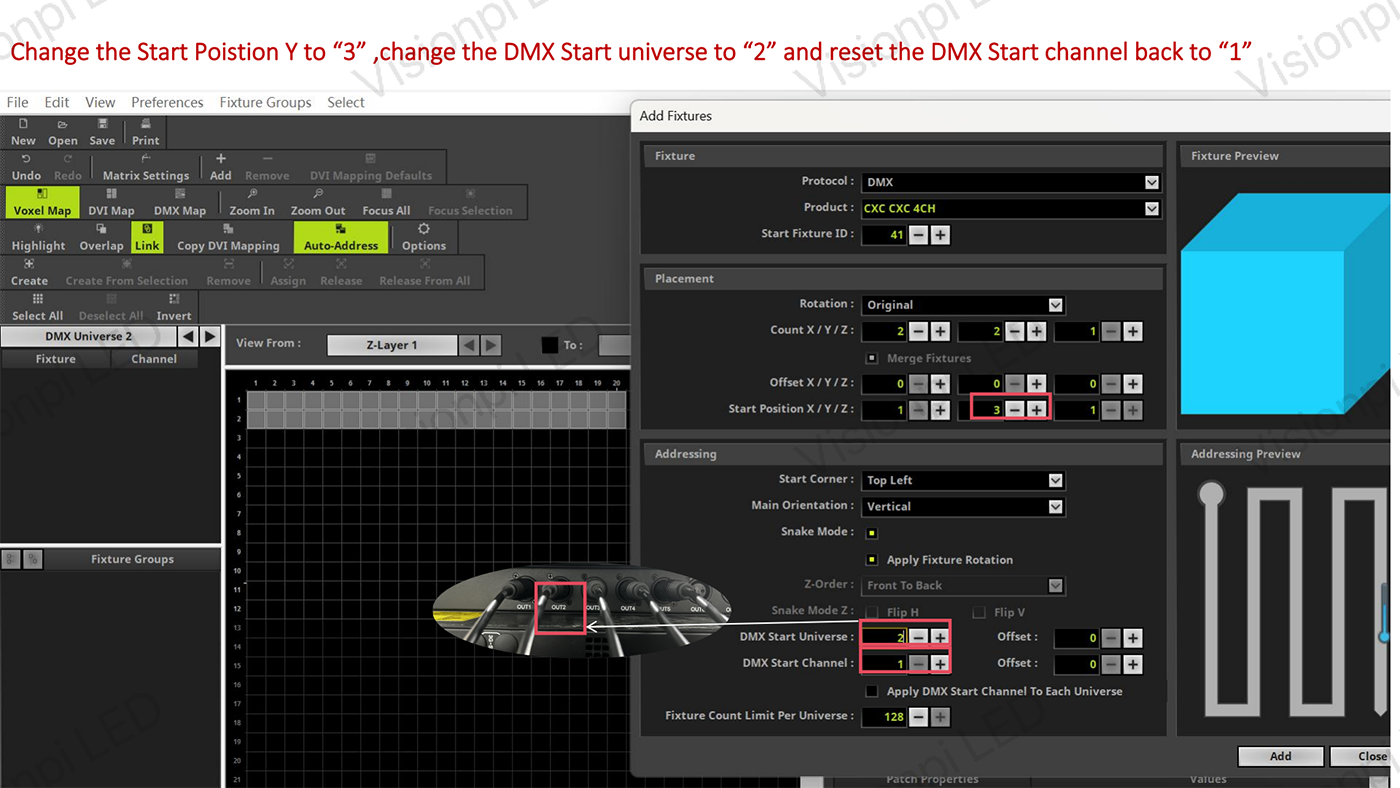
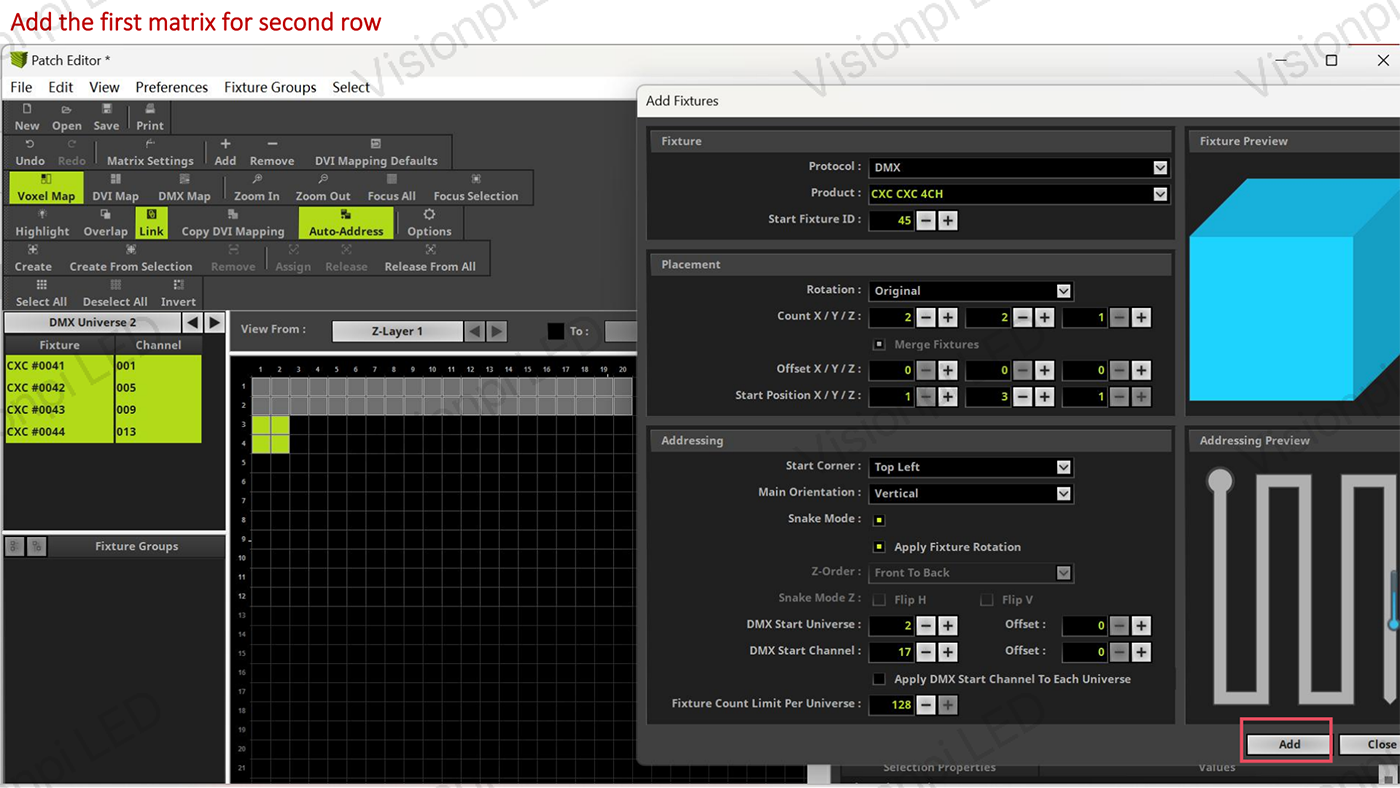
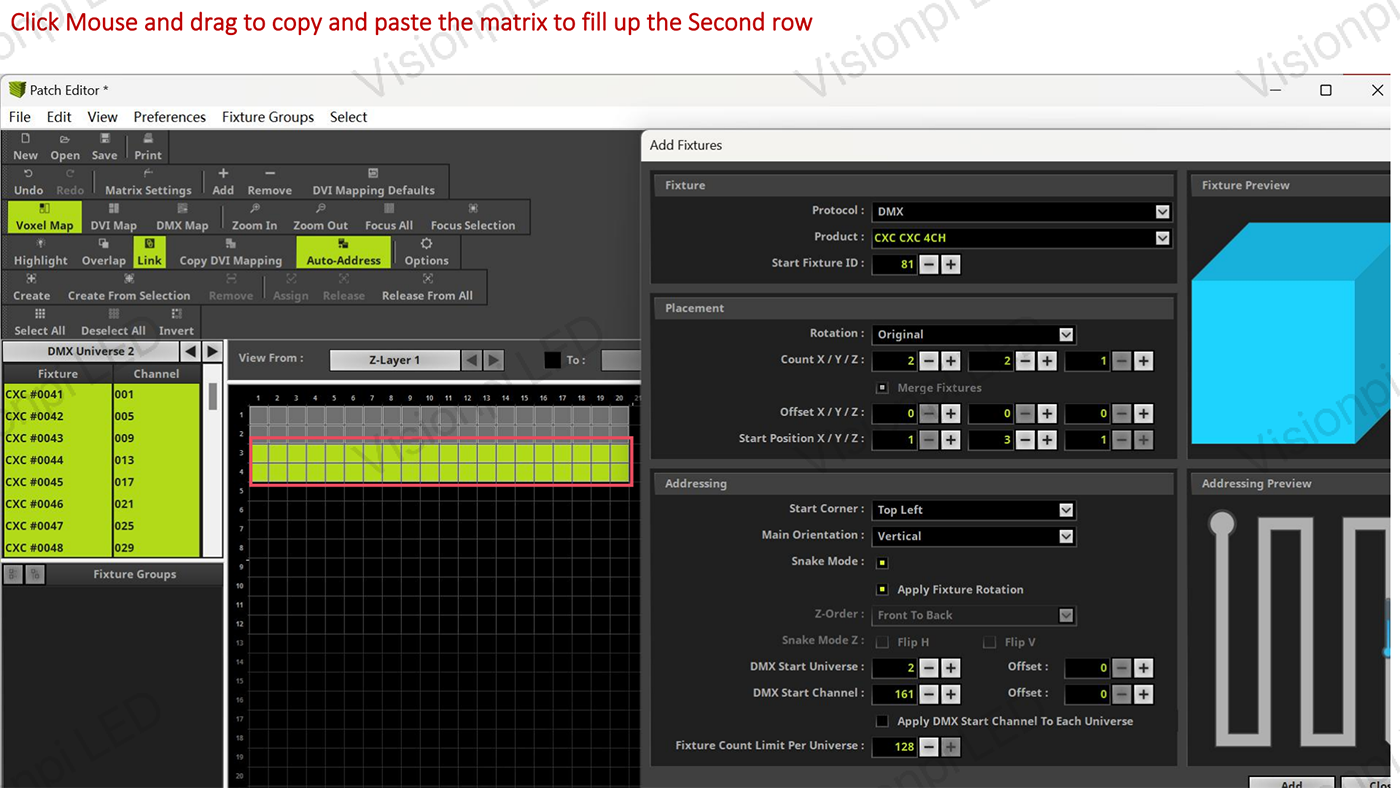
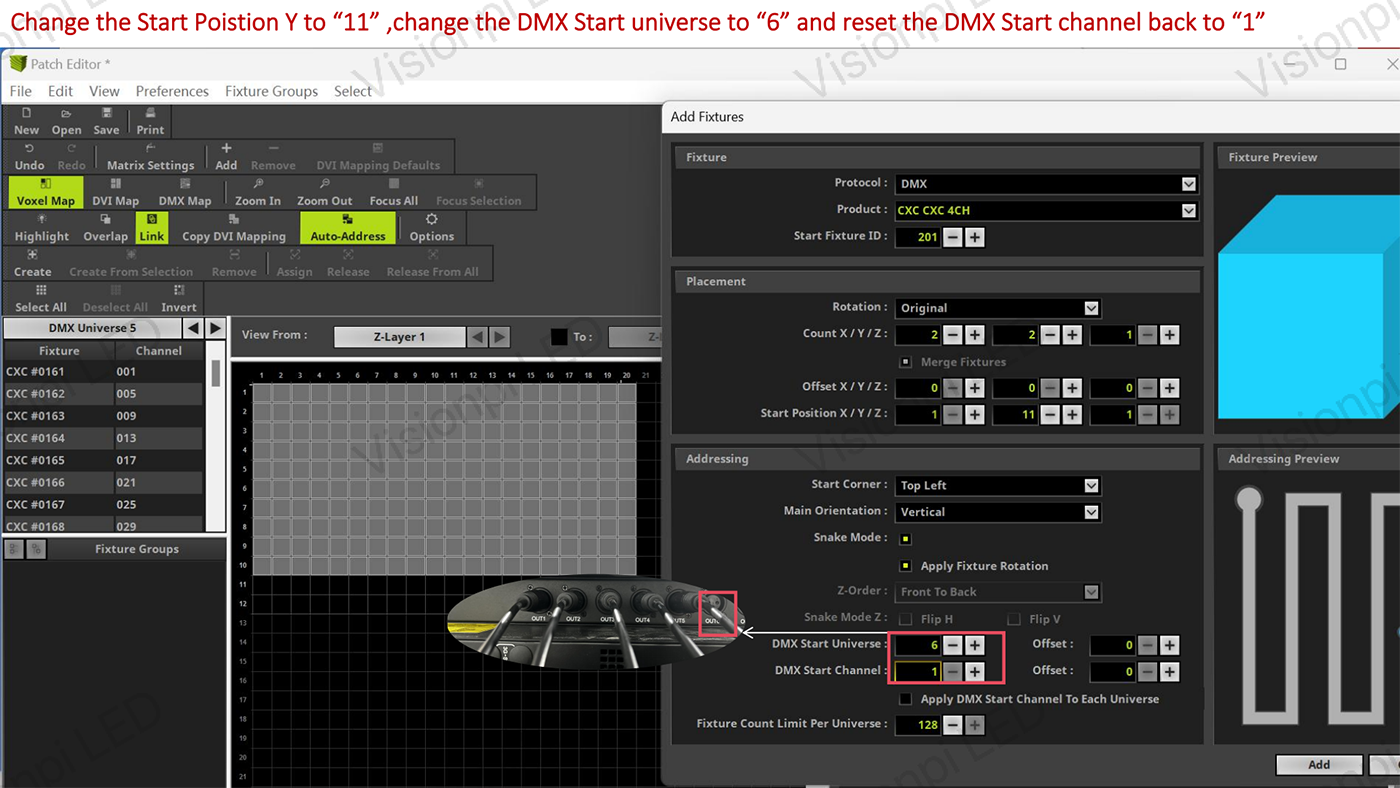
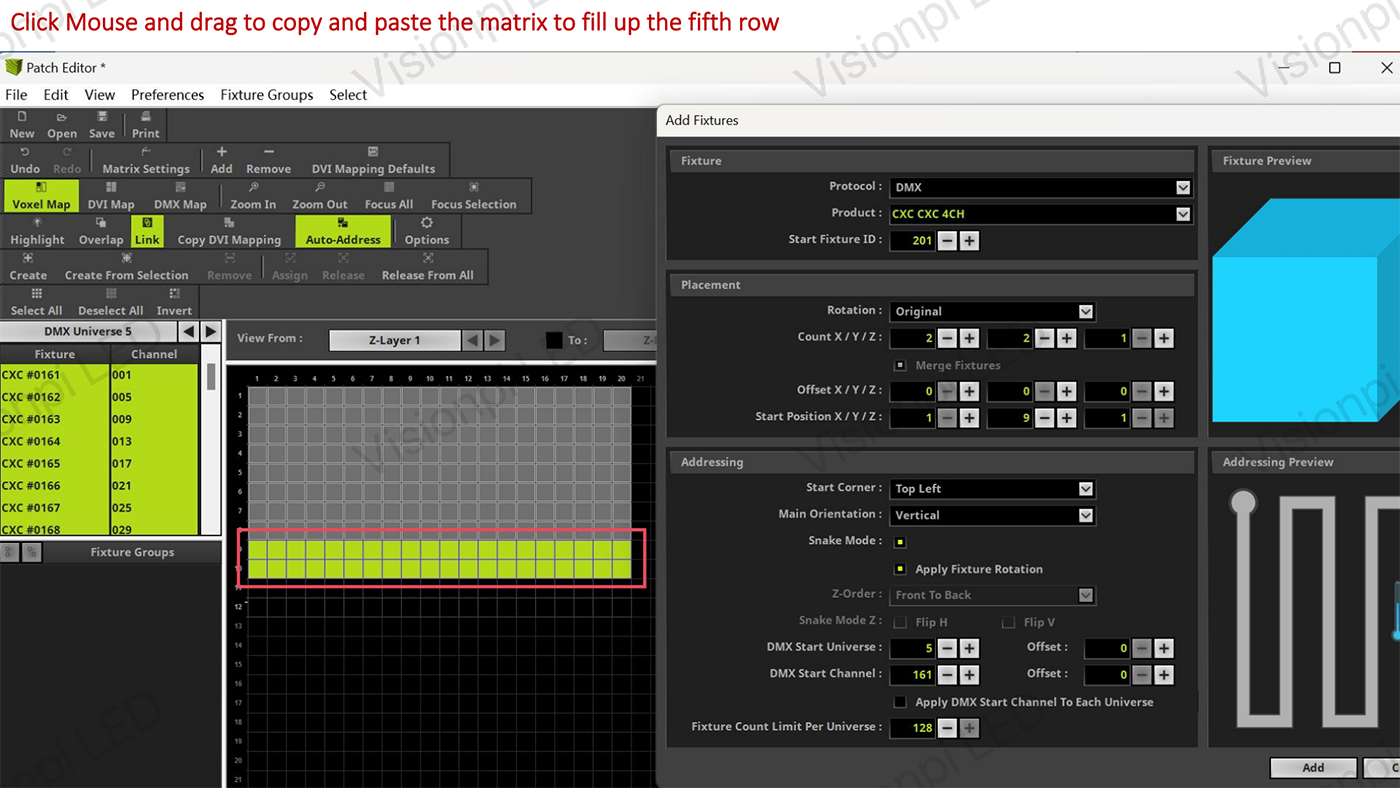
1. Open the **Patch Editor** in MADRIX.
2. **Add Fixtures** for each LED unit in your kinetic display. This may involve selecting the specific type of fixture and its respective **DMX address**.
3. Drag and arrange the fixtures on the grid to match their real-life positioning, ensuring that the layout in MADRIX reflects the physical display.
4. If your kinetic LEDs move, you will need to adjust the patch dynamically to account for the physical changes in positioning.
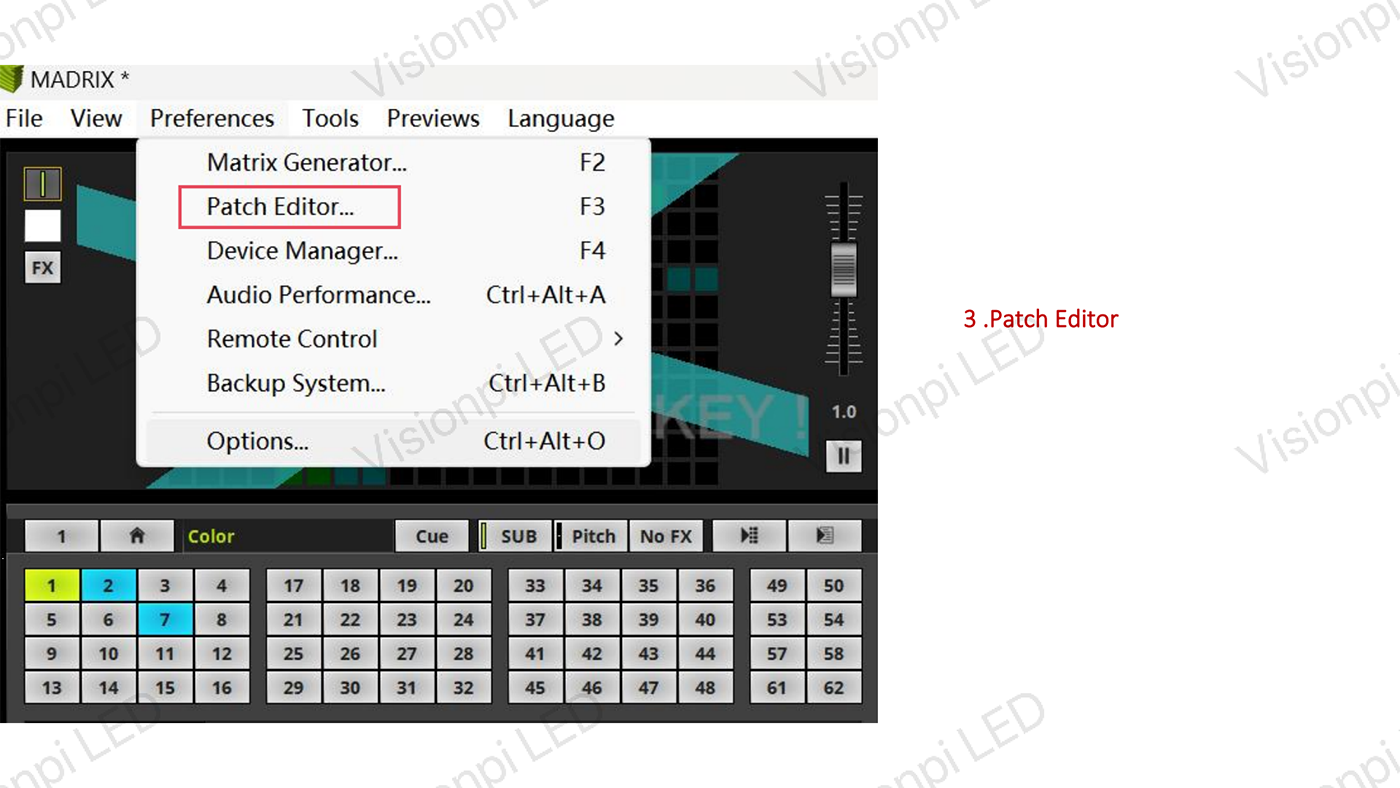
Fixture Setting
Creating Effects and Animations
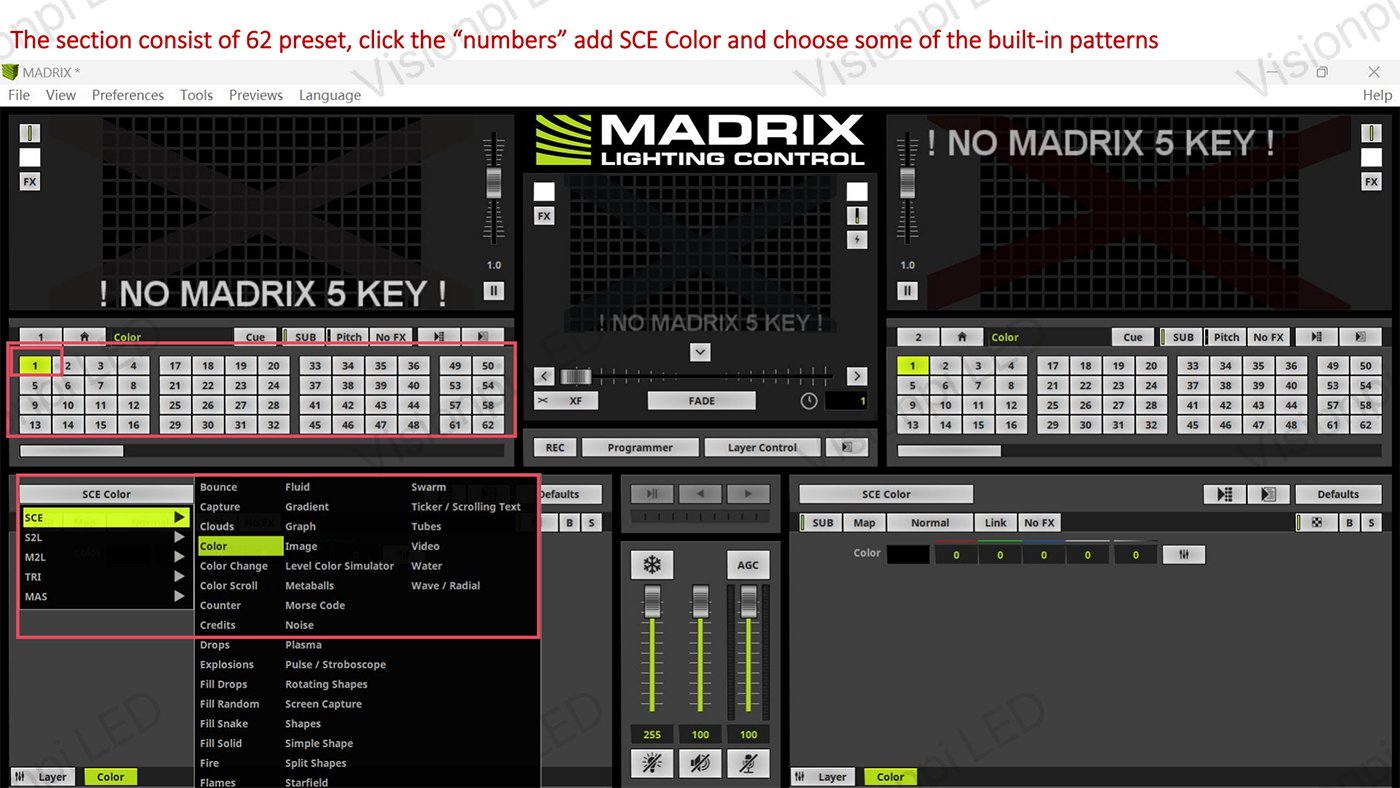
MADRIX provides a range of visual effects and dynamic patterns that you can apply to your LED display.
Steps to Create Effects:
1. In the **Effect Generator**, explore the available options such as **color flows**, **wave effects**, and **particle animations**.
2. Apply effects to the LED grid that you have patched earlier.
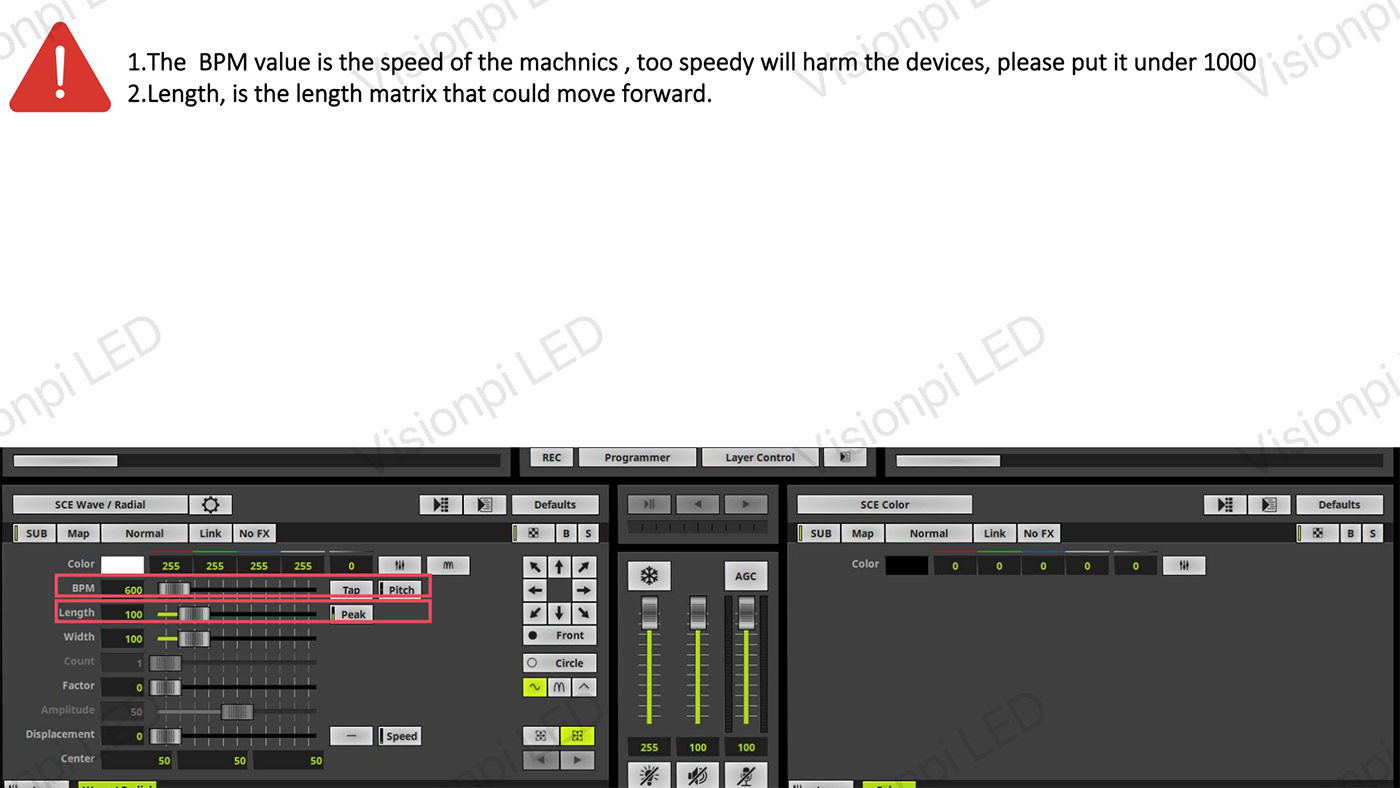
3. Adjust the **speed**, **intensity**, and **direction** of the effects to synchronize with the movement of your kinetic display.
4. For interactive or music-based environments, use the **Sound2Light** or **Music2Light** features to sync effects with audio tracks.
Live Control and Programming
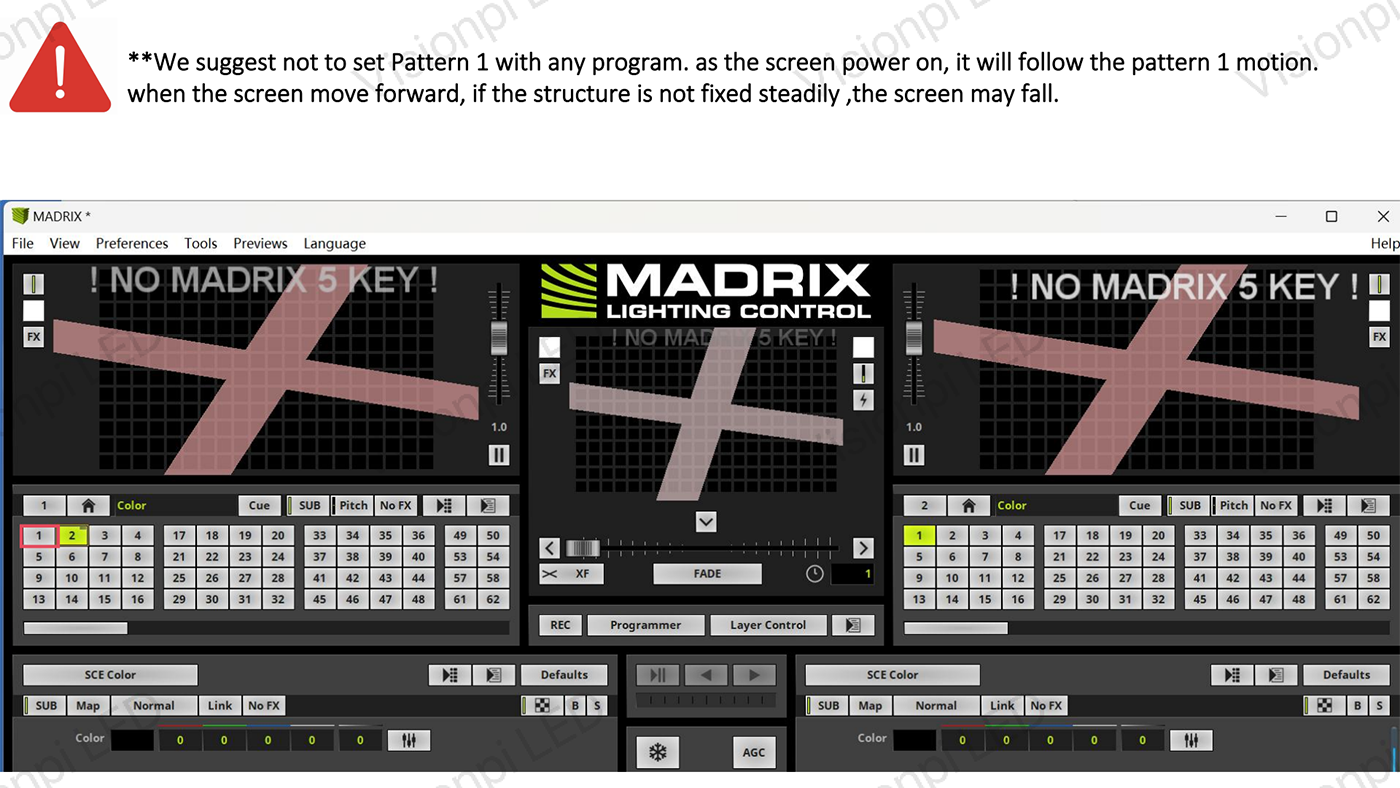
One of the great features of MADRIX is its ability to provide live control over the LED display.
Live Control:
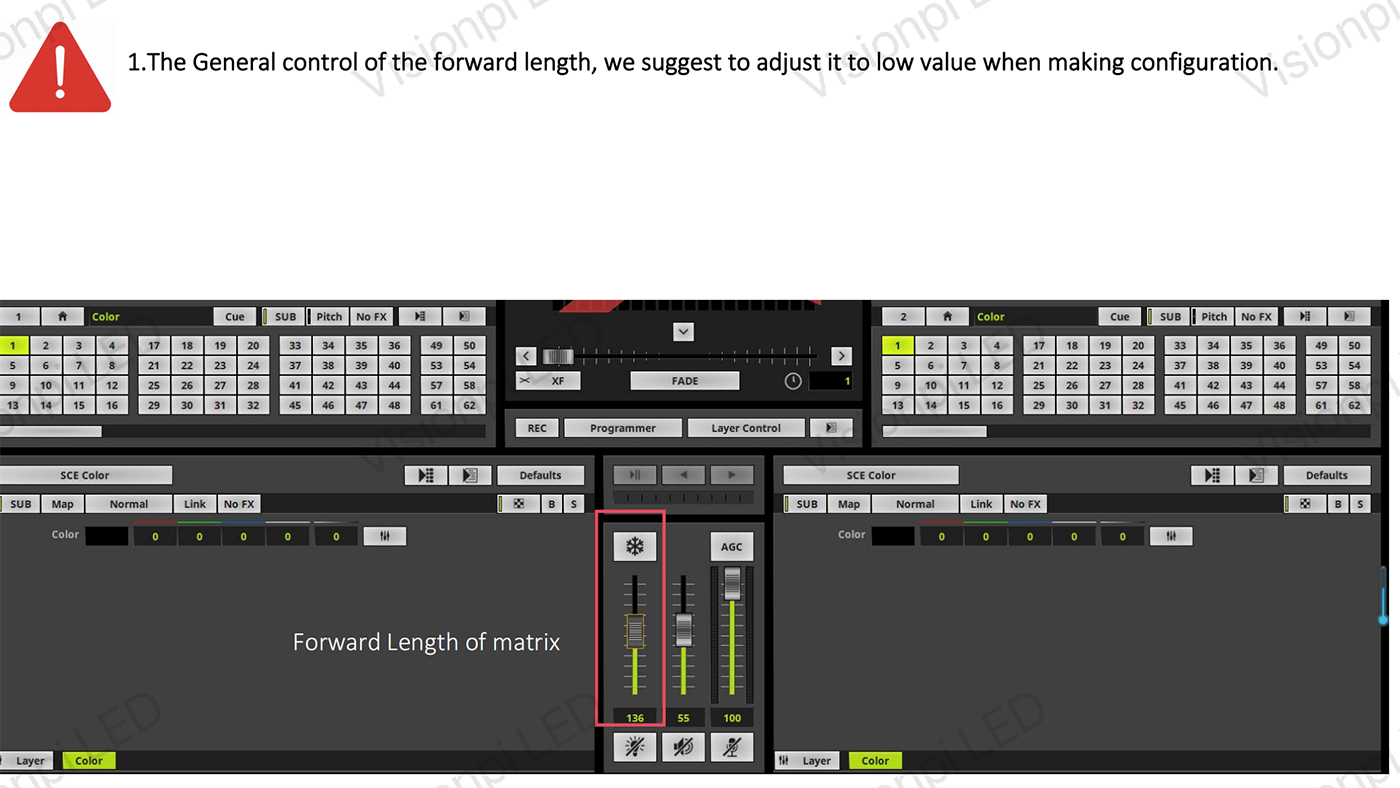
– Use the **MADRIX Control Panel** to adjust effects in real-time.
– For kinetic LED displays, control both the **visual effects** and the **motion** (via the DMX controller) simultaneously to create immersive and synchronized experiences.
– Create **sequences** and **timelines** to automate certain effects, allowing for programmed shows or automatic responses to triggers.
Final Testing and Tweaking
Once your setup is complete, it’s time to test the system.
Testing:
– Run a test of the full display to ensure all **LEDs light up** correctly and that the **kinetic movements** are synchronized with the effects.
– Monitor the **DMX controller** and **MADRIX software** for any communication issues.
– Adjust the positioning, effects, or DMX addresses if needed to resolve any issues.
By following these steps, you will be able to set up and control a kinetic LED display using MADRIX software. With its powerful effects, real-time control, and ability to manage complex layouts, MADRIX makes it easy to create stunning visual experiences that move and transform with your LED setup.
Whether you’re creating an immersive stage design or an interactive art installation, MADRIX provides the tools to bring your kinetic LED displays to life with ease. Happy programming!

