How to Set Up DNA Rotating LED Display

How to Set Up DNA Rotating LED Display | Full Installation Tutorial

How to install indoor led wall

1. Preparations

1.1. Unpacking

Warning: To prevent damage to the LED panel, wear anti-static gloves before installing/touching the display. After unpacking, do not place the display vertically on the floor, an accident such as a fall may be caused.

DNA SPINING LED DISPLAY Signal Connection Topology Diagram

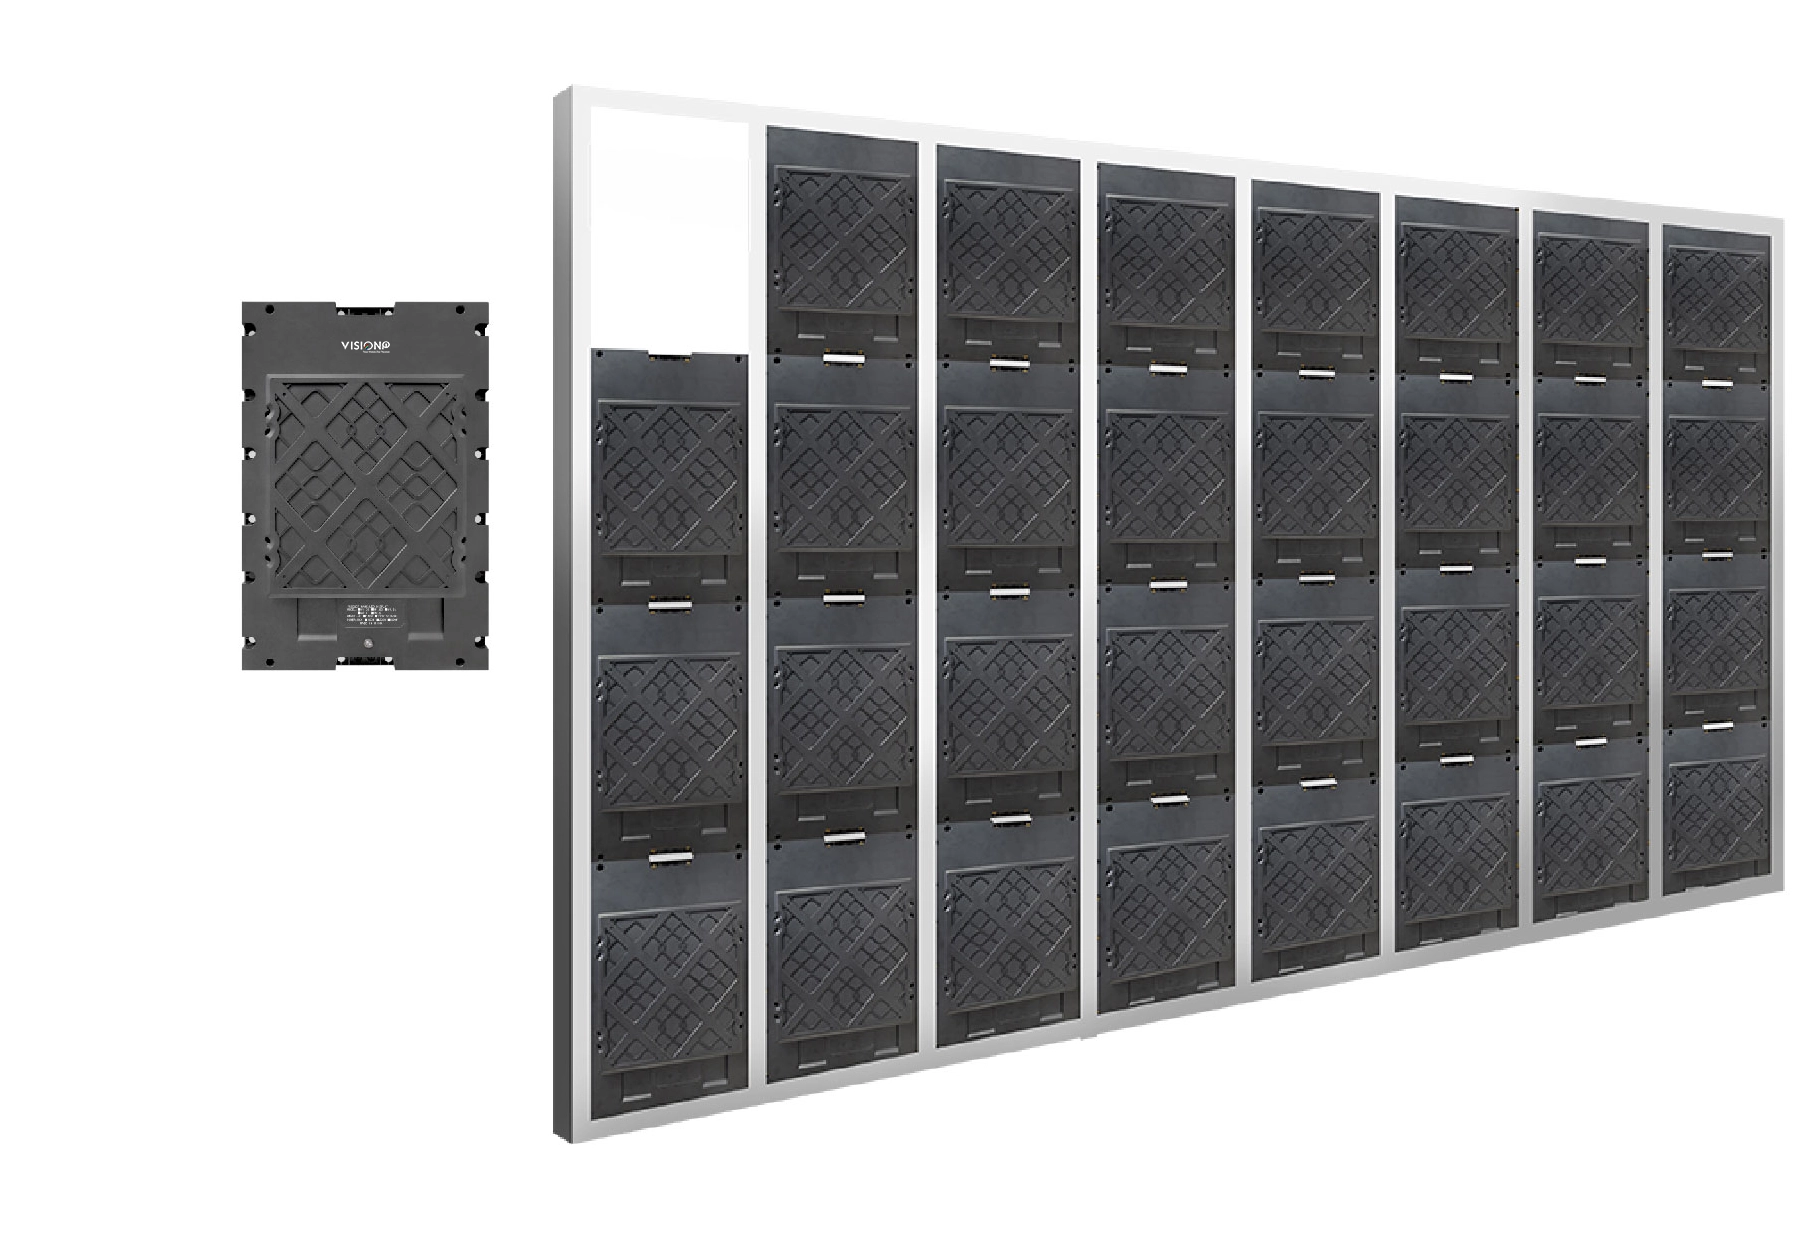
LED Module: 250×250mm. One receiving card per layer (both sides). Total 6 LED modules for Side A & B.

DNA Rotating LED Display Motor Controller Connection Diagram

DNA ROTATING LED DISPLAY MOTOR CONTROLLER CONNECTION DIAGRRAM

IP Controllers: Preconfigured

Motor Controller Port Wiring Guide
  1. Port Setup
    • 8 preconfigured ports (1–8), factory-assigned to devices No. 1–8.
  2. Wiring Rules
    • Connect each port only to its matching device (e.g., Port 1 → Device 1).
    • No cross-connections to avoid signal issues or equipment damage.
Servo Motor Controller Default IP & PC Setup

Servo Motor Controller Default IP & PC Setup

Default IP Subnet for Servo Motor Controller
  • Controller Default IP Subnet: 192.168.1.xxx

    (Example: 192.168.1.253 is a typical device IP address)

Computer IP Configuration Requirements

Same Subnet Rule

The computer’s IP address must reside in the same subnet as the controller (i.e., 192.168.1.xxx).

  • Subnet Mask: Must be 255.255.255.0 (standard for Class C private networks)
IP Conflict Avoidance

The computer’s IP address cannot duplicate the controller’s IP address.

(Example: If the controller uses 192.168.1.253, the computer cannot use 192.168.1.253.)

Valid Computer IP Examples
    • 192.168.1.250
    • 192.168.1.100
    • Any unused address within 192.168.1.1 to 192.168.1.254 (excluding the controller’s IP)
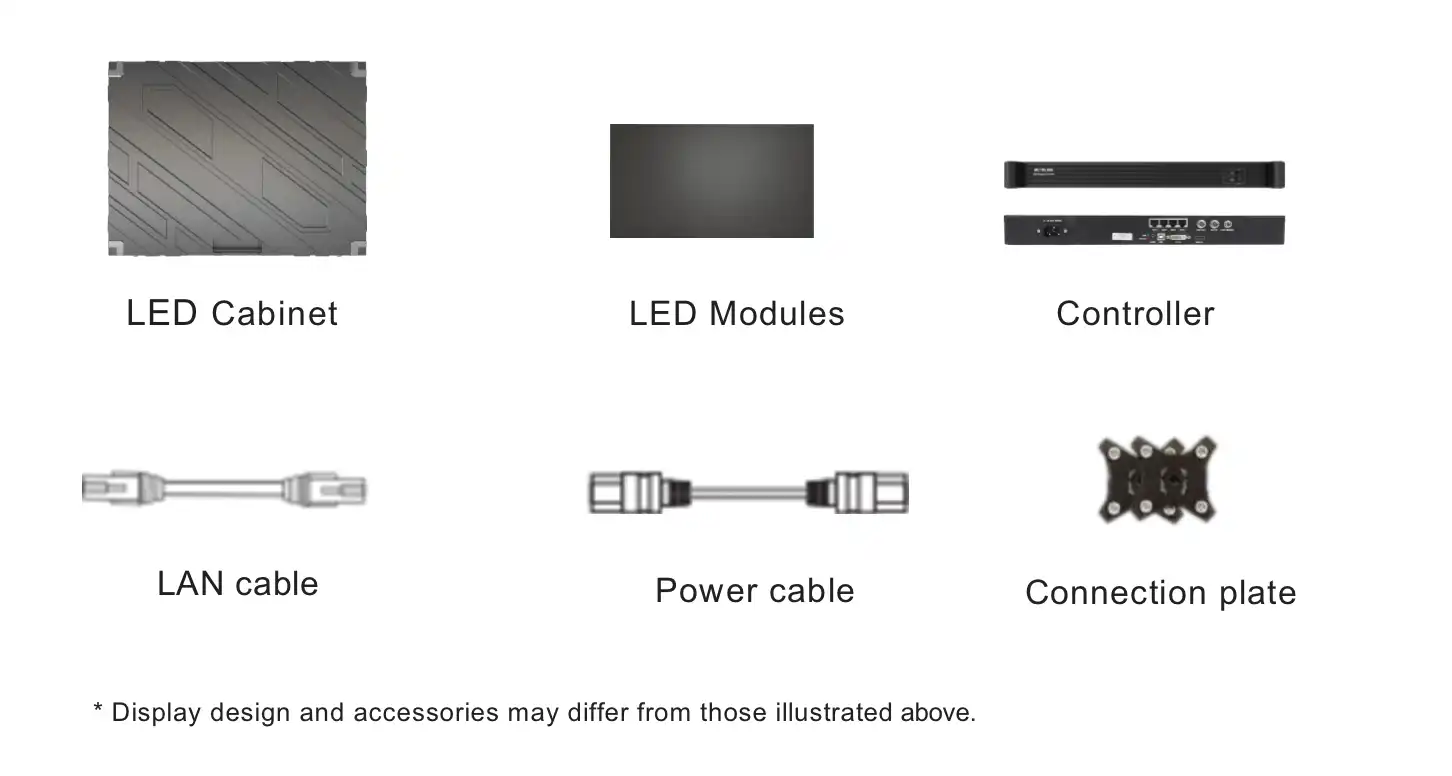
led display and accessories visionpi led display
1.3. Tools

• LED Cabinets &LED Modules

• Power cable;LAN cable (RJ45, CAT-5)

• Connection plates

• LED Controller
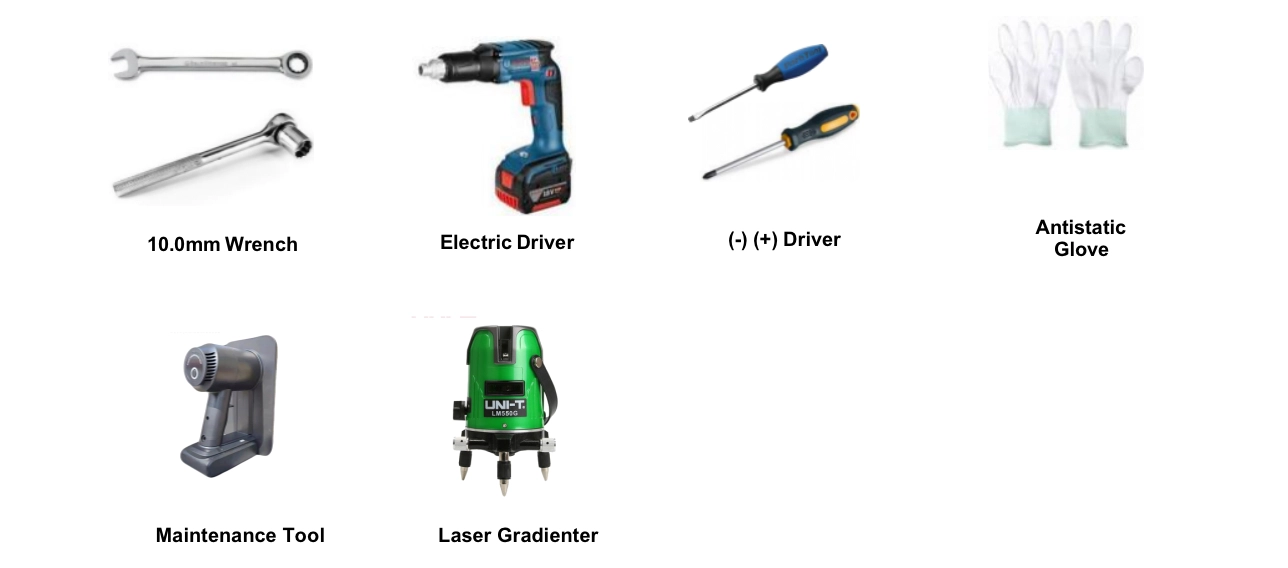
led screen installation tools
• Test led modules

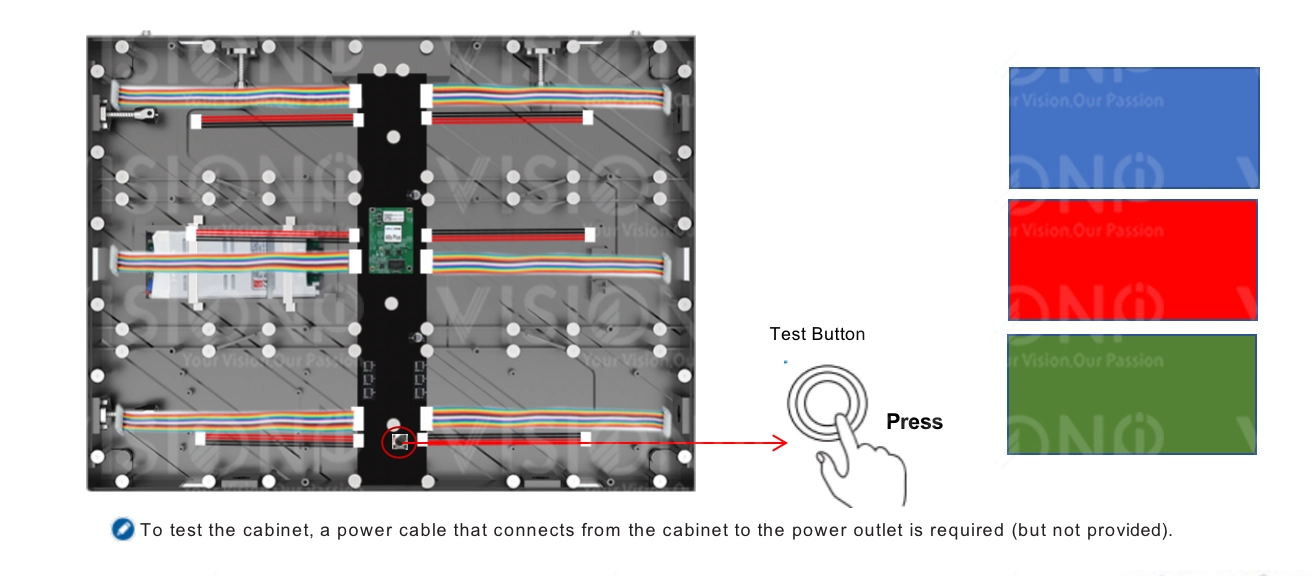
Press the CHECK button on the back of each cabinet to check if the product can operate normally.
test led display

2. Structure Installation

Precautions when handling the cabinets:

• Do not drop or apply shock/vibration to the product. Strong impacts may damage the component inside.

• Only a qualified service technician should perform the installation.

• Only use approved cabinets. • Be careful not to damage the corners of the cabinet.

• Install the display in a well-ventilated area.

• Always wear anti-static gloves when touching the display.

• Provide air conditioning around the LED display to allow heat dissipation away from the display.

• To maintain proper ventilation, keep clear space from the mounted displays to the wall. Installing the product in poorly ventilated spaces may damage the LED.
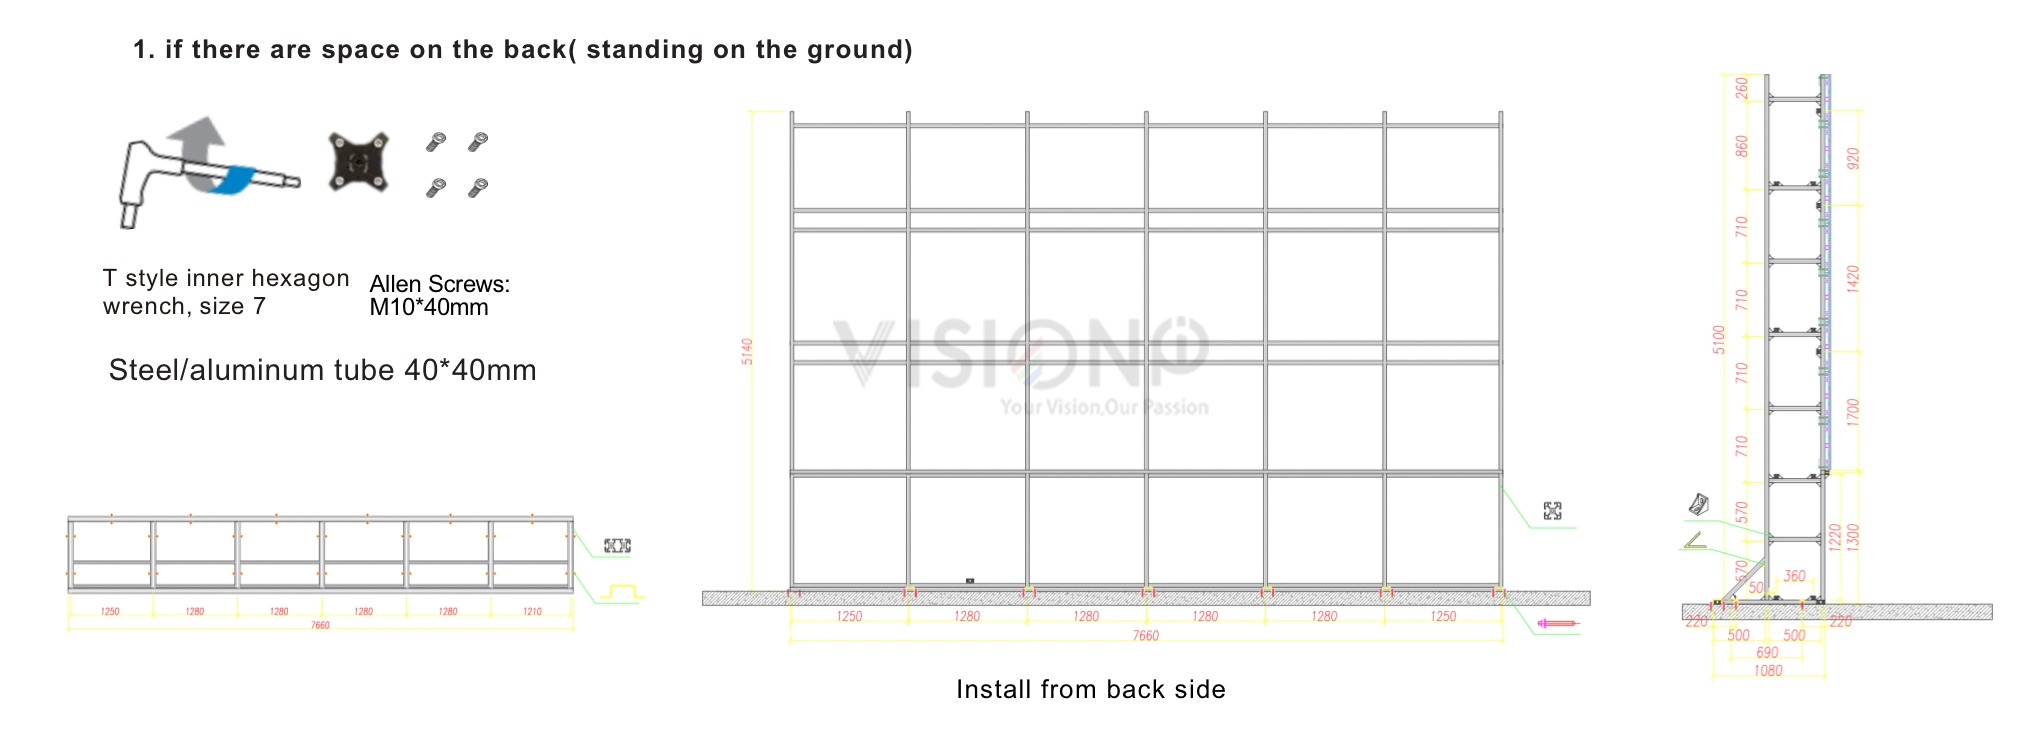
led display installation standing structure

Wall Mount Kits

A wall mount kit is made of aluminum profile 40x40mm (in some regions sold separately or available from third party vendors) allows you to mount the LED display on the wall. For detailed information on installing the wall mount, see the instructions provided with the wall mount. Wall mounting can only be performed from the front side of cabinets.
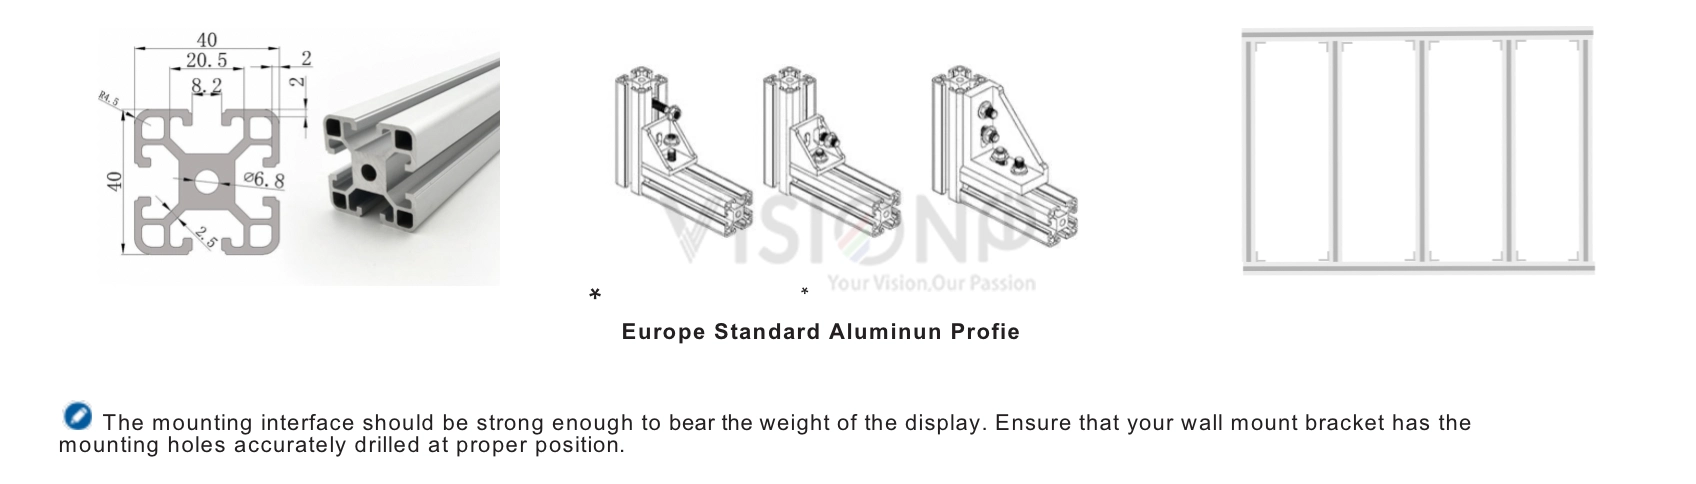
wall mounted structure led wall visionpi
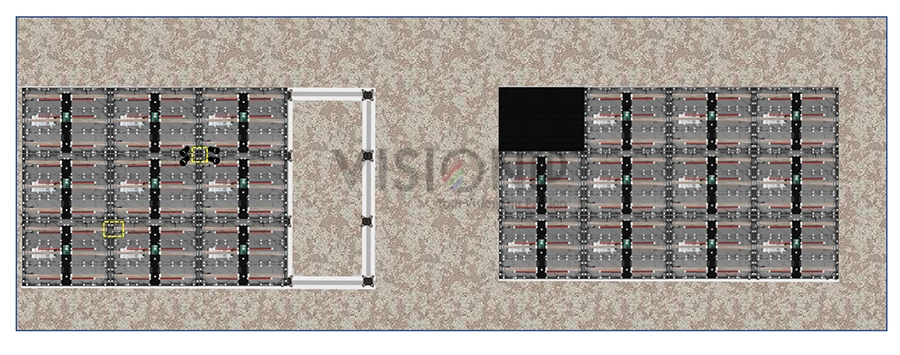
1. Fixed the aluminum profile on the wall with anchors. Insert cage nuts into the slot of the aluminum pipe

2. Insert the connection plate on the structure, and use the Allen screw bolt to connect the cage nuts.
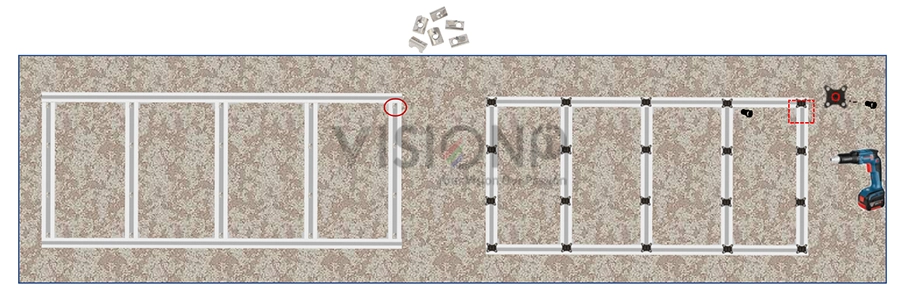
led wall wall mouted structure
3 connect cabinets with structure by connection plate with Allen; connect cabinets together by faster lockers

4. Install led modules (follow the arrow direction of the modules)
led screen installation steps

3. Cabinet installation

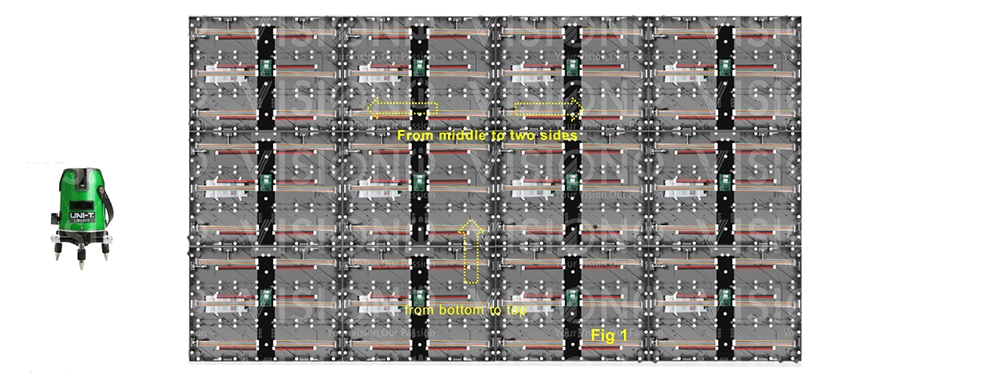
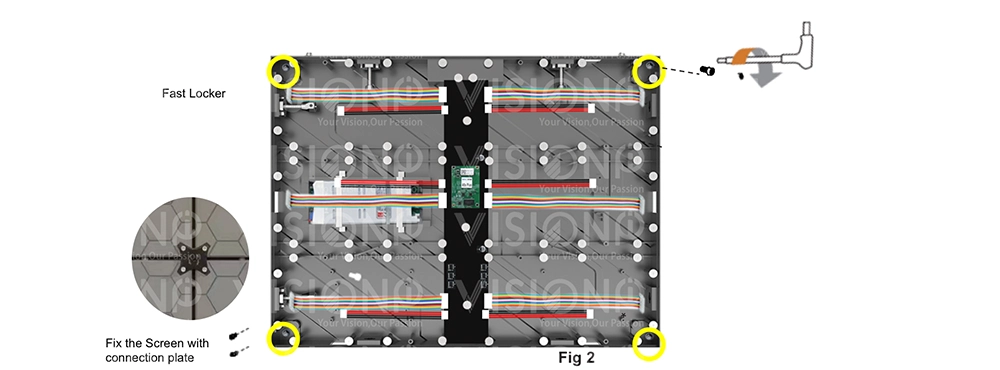
Step 1. Use a gradienter to adjust the flatness and verticality and then secure the cabinet to the connectors on the rack frames. Use connection plates to fix the screen. Start your installation from the bottom row. Install the connecting plates on the bracket (Fig 1). Rotate the hex key clockwise until the screw bolts are inserted, and fasten the fast locker on between two cabinets (left to right, up to down)(Fig2.) ※Do not fix the screws between the connectors and cabinets too tight for future adjustment.
led screen cabinet installaiton
Step 2. Install the connecting plates on the structure. Rotate the hex key clockwise until the screw bolts are inserted. Do not over-tighten the screw bolts yet as you may need to adjust the connecting plates again. Ensure that the seam and flatness between cabinets conform to the standard after each cabinet is installed. Otherwise, make some adjustments, lockout LED lamp boards after they are adjusted horizontally and vertically because the boards will probably be moved during the installation of other lamp boards. Repeat the above steps to install the other cabinets in the lowest row.
connect two led screen cabinet
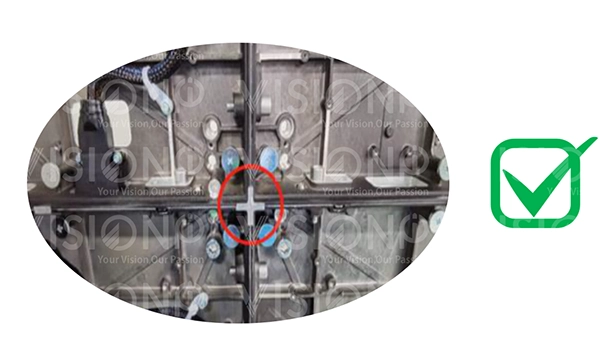
Step 3. fasten the lockers and check the unevenness of the nearby cabinets, and adjust them by the hex, loosen, or tighten to bring the cabinets to the same level. can use fingers to feel the “cross” of four nearby cabinets to see if the cabinet is well aligned. Ensure that all the cabinets are flat and vertical and the seams between the cabinets are even. Then tighten the screws to complete the installation.
cabinets connection

4. Power and Signal Wiring

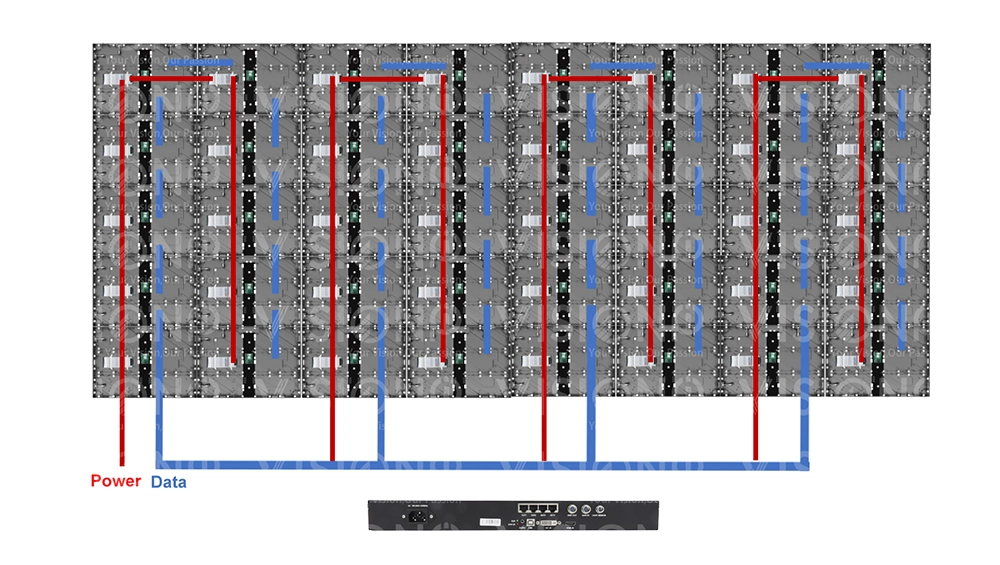
The data wiring process must follow a zigzag order between the cabinets, always starting from the one located at the bottom left. The modules are then connected to the data in and data out ports. Thanks to our system software we can verify the correct wiring of the entire screen with simple tests. Finally follows the color calibration and brightness setting.
 5. LED Modules installation.

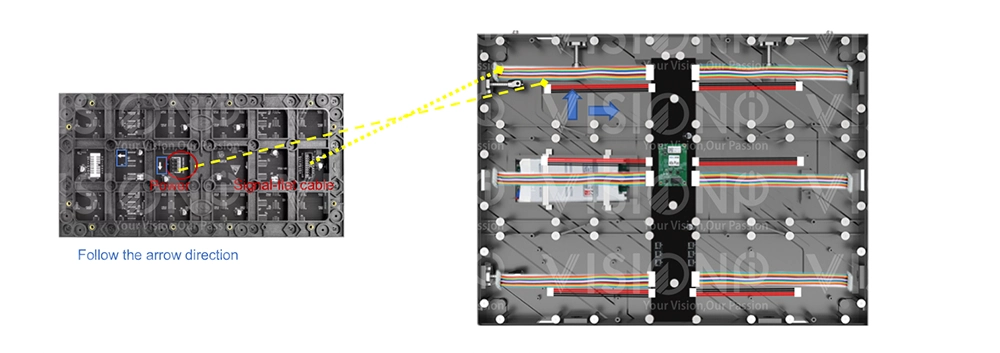
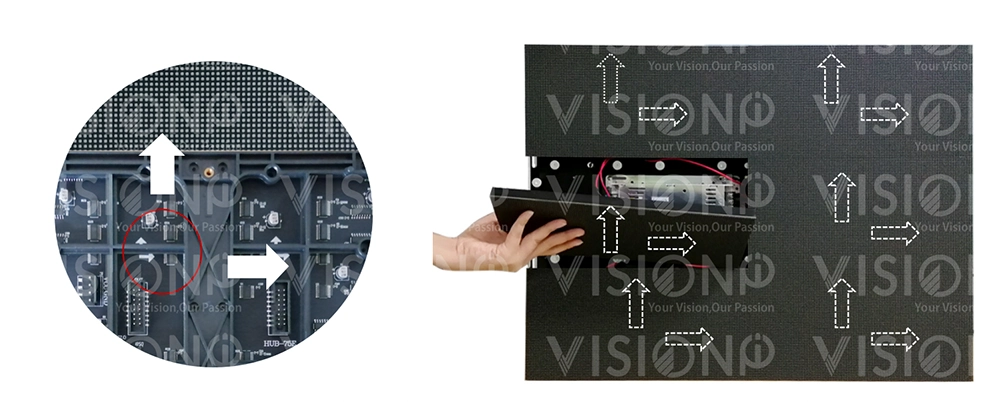
After check all the cabinets are well installed, attach the led modules to the cabinet, please check the arrow on the back of the PCB and follow the direction, and connect the flat cable and power cable from the hub to each of the modules. tips: to check the status of each led module on the cabinet, you can use one spare cabinet to test the condition of the led modules by pressing the test button on the hub.
led modules installaiton step 4
To install the module to the hub board, the flat cable that connects between them has to be properly wired. One end of the flat cable is already attached to the hub board, use the other end to connect it to the module. Before connection, make sure that the arrow sign on the module ispointing up. Connect the flat cable to the connector on the module until it clicks into place. 
modules installaiton indoor led screen

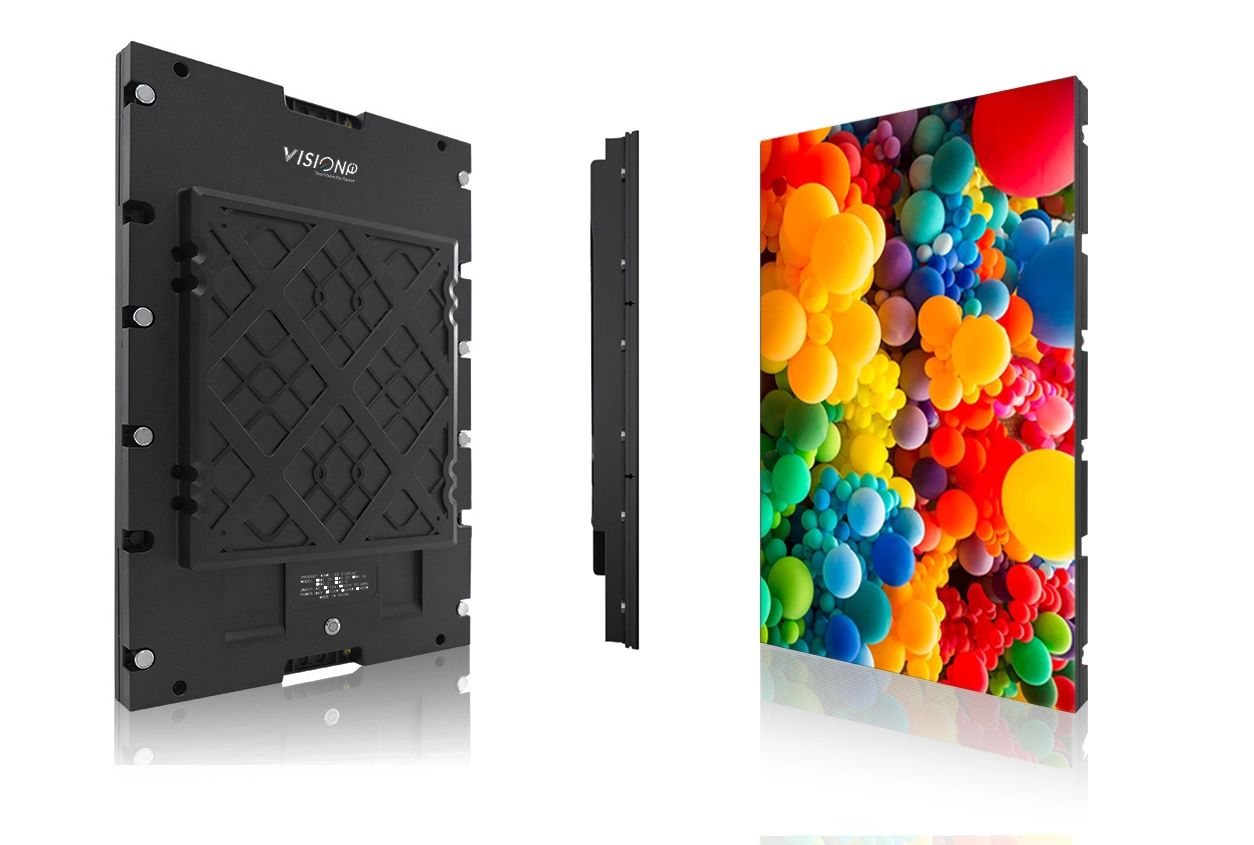
Modular Cabinet 320x480mm Installation
320x480mm led cabinet installation layout

SMD COB GOB Textured LED Display

Textured LED Display

Nowadays, people’s pursuit of interior spatial aesthetics is evolving. From home appliances to smart devices, products are expected to be both functional and aesthetically pleasing. Refrigerators can be flush-integrated into walls, speakers serve as spatial ornaments, and lighting fixtures themselves are increasingly treated as works of art.

Televisions and conventional LED displays, however, have long been an exception. When powered off, they remain stark, obtrusive black blocks that disrupt interior harmony. Against this backdrop, art display screens have attracted growing attention across the industry.

cob art led screen multiples texture ,customized

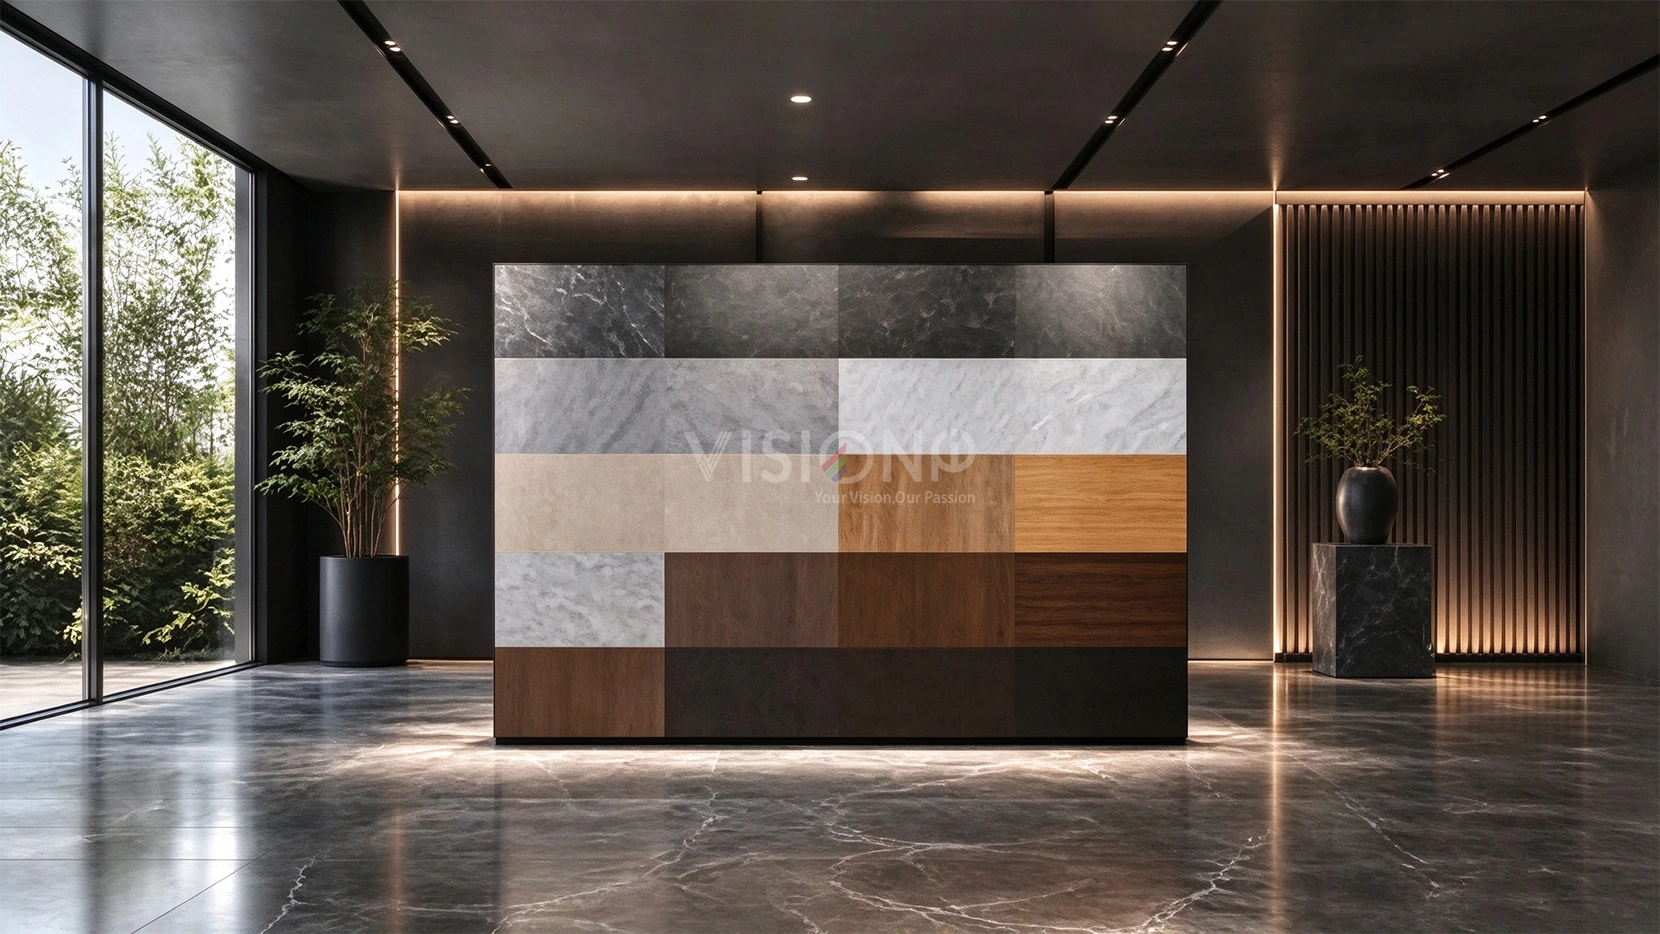
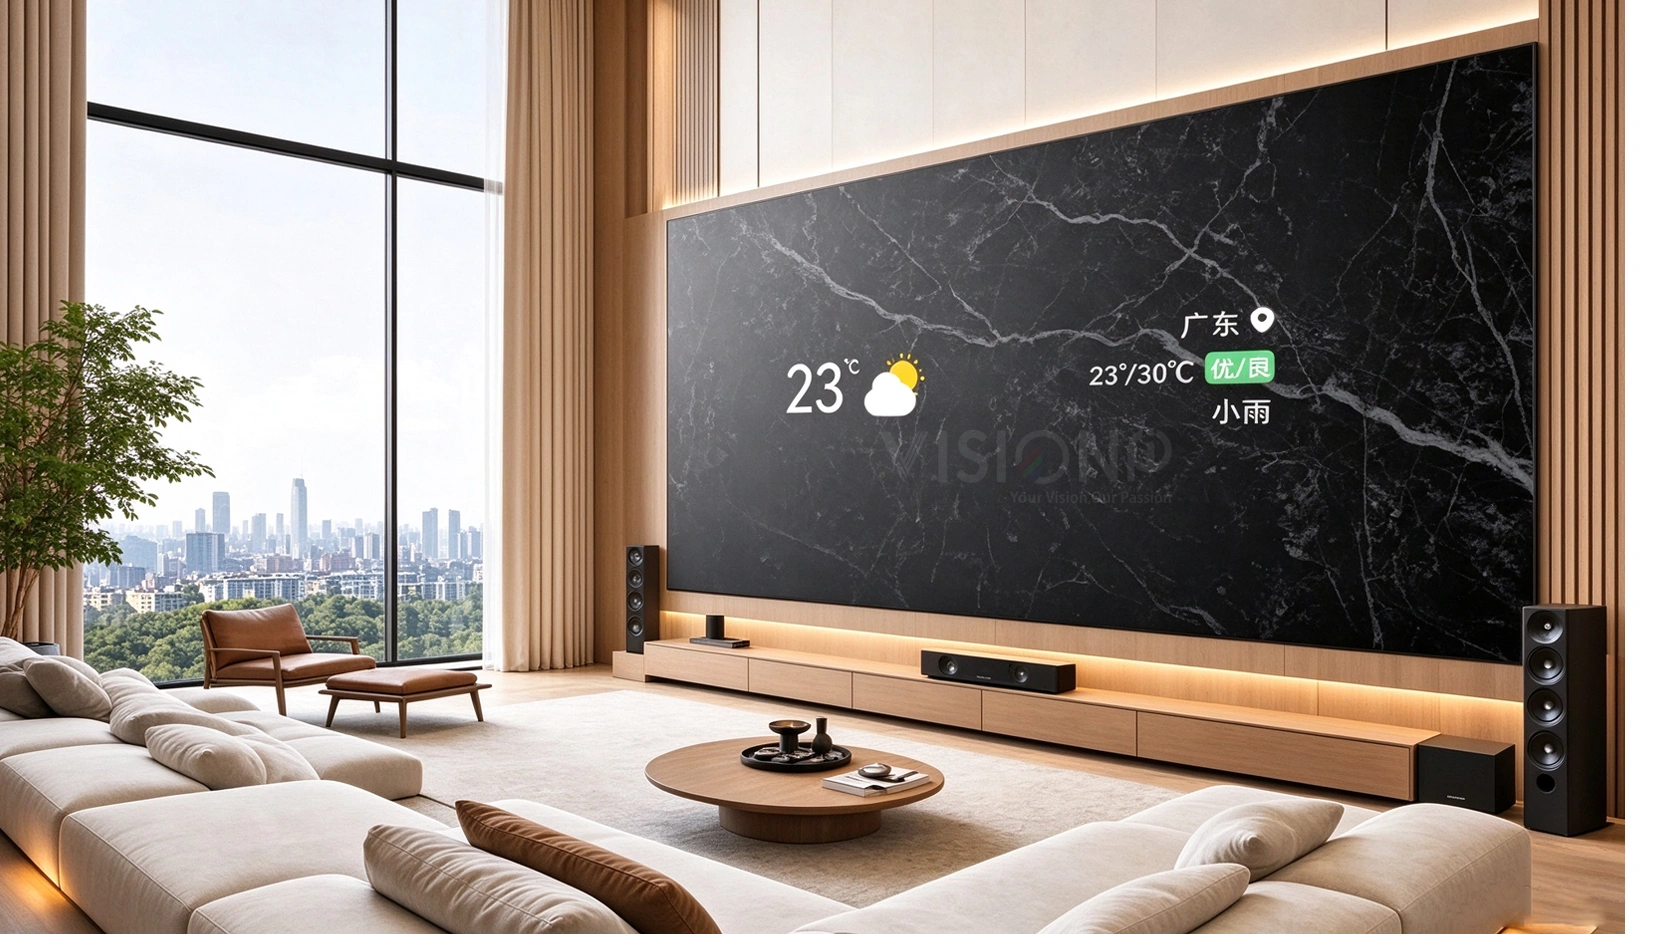
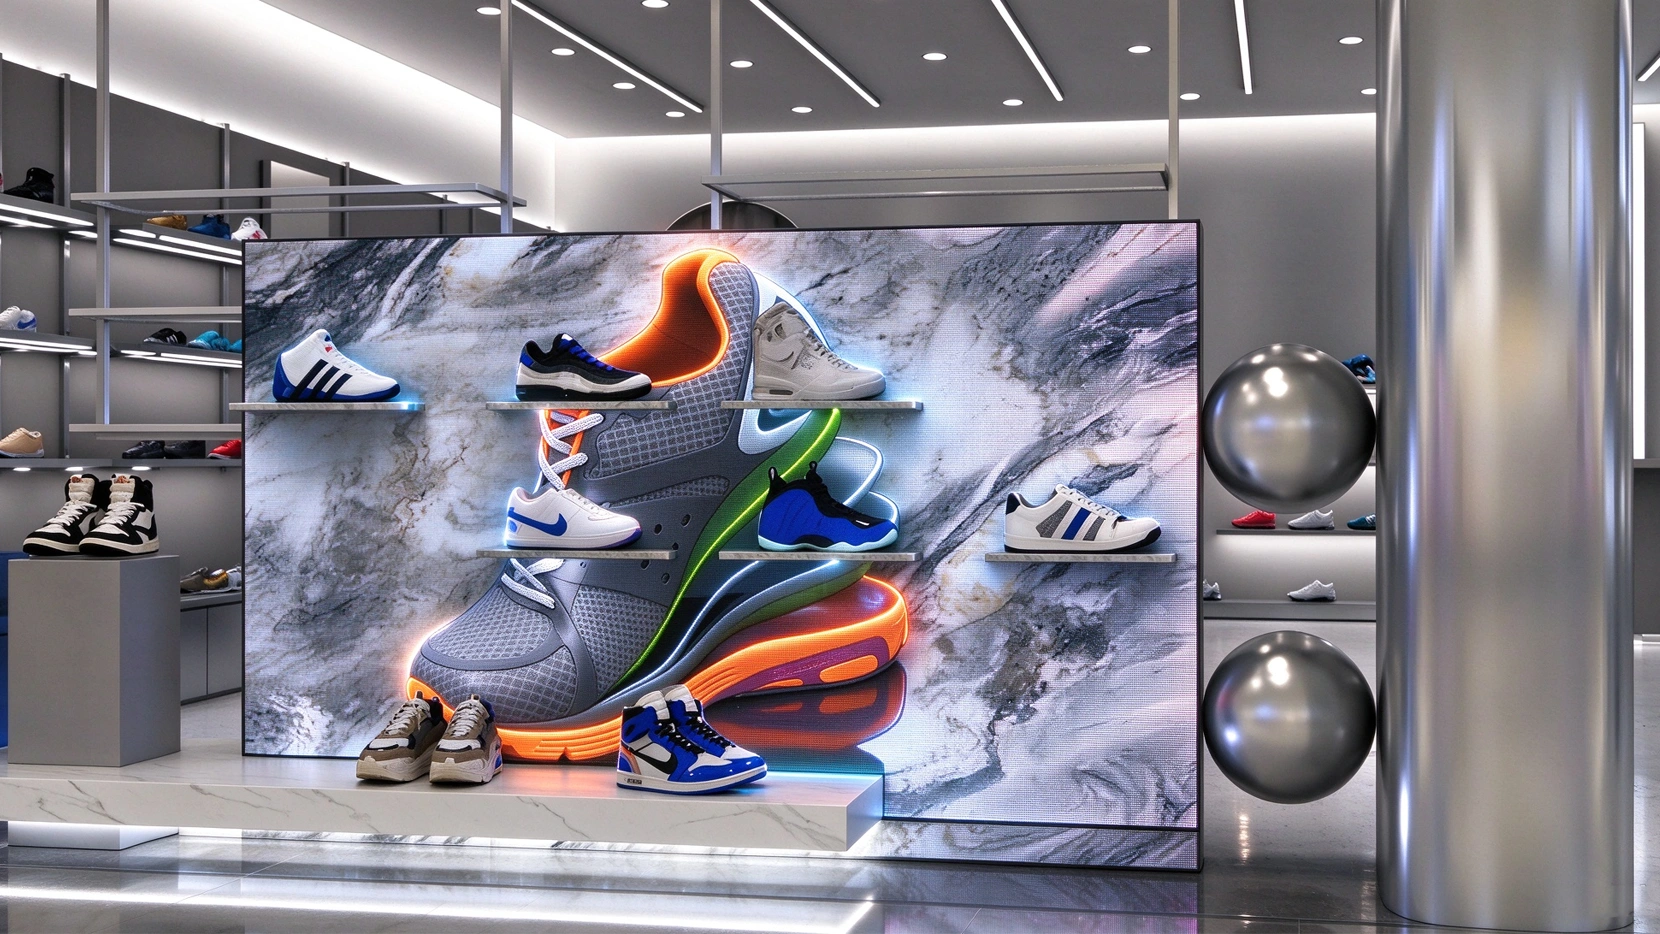
An art texture screen is an LED display with artistically processed surfaces, customizable with wood grain, marble texture, metal finish, fabric texture, exclusive paintings, or brand graphics according to spatial design requirements. When off, it serves as decorative artwork that blends seamlessly into the space; when on, it delivers refined, precise images and color performance. It unifies display functionality and aesthetic presentation.

Nevertheless, an art screen is far more than simply printing a pattern onto an LED panel. The underlying display technology directly determines its image performance, surface protection, long-term reliability, and customization capability. Three mainstream technical solutions are available on the market: SMD art screens, GOB art screens, and COB art screens, each with its own trade-offs.

GOB Textured LED Screen: Cost-effective with Flexible Customization

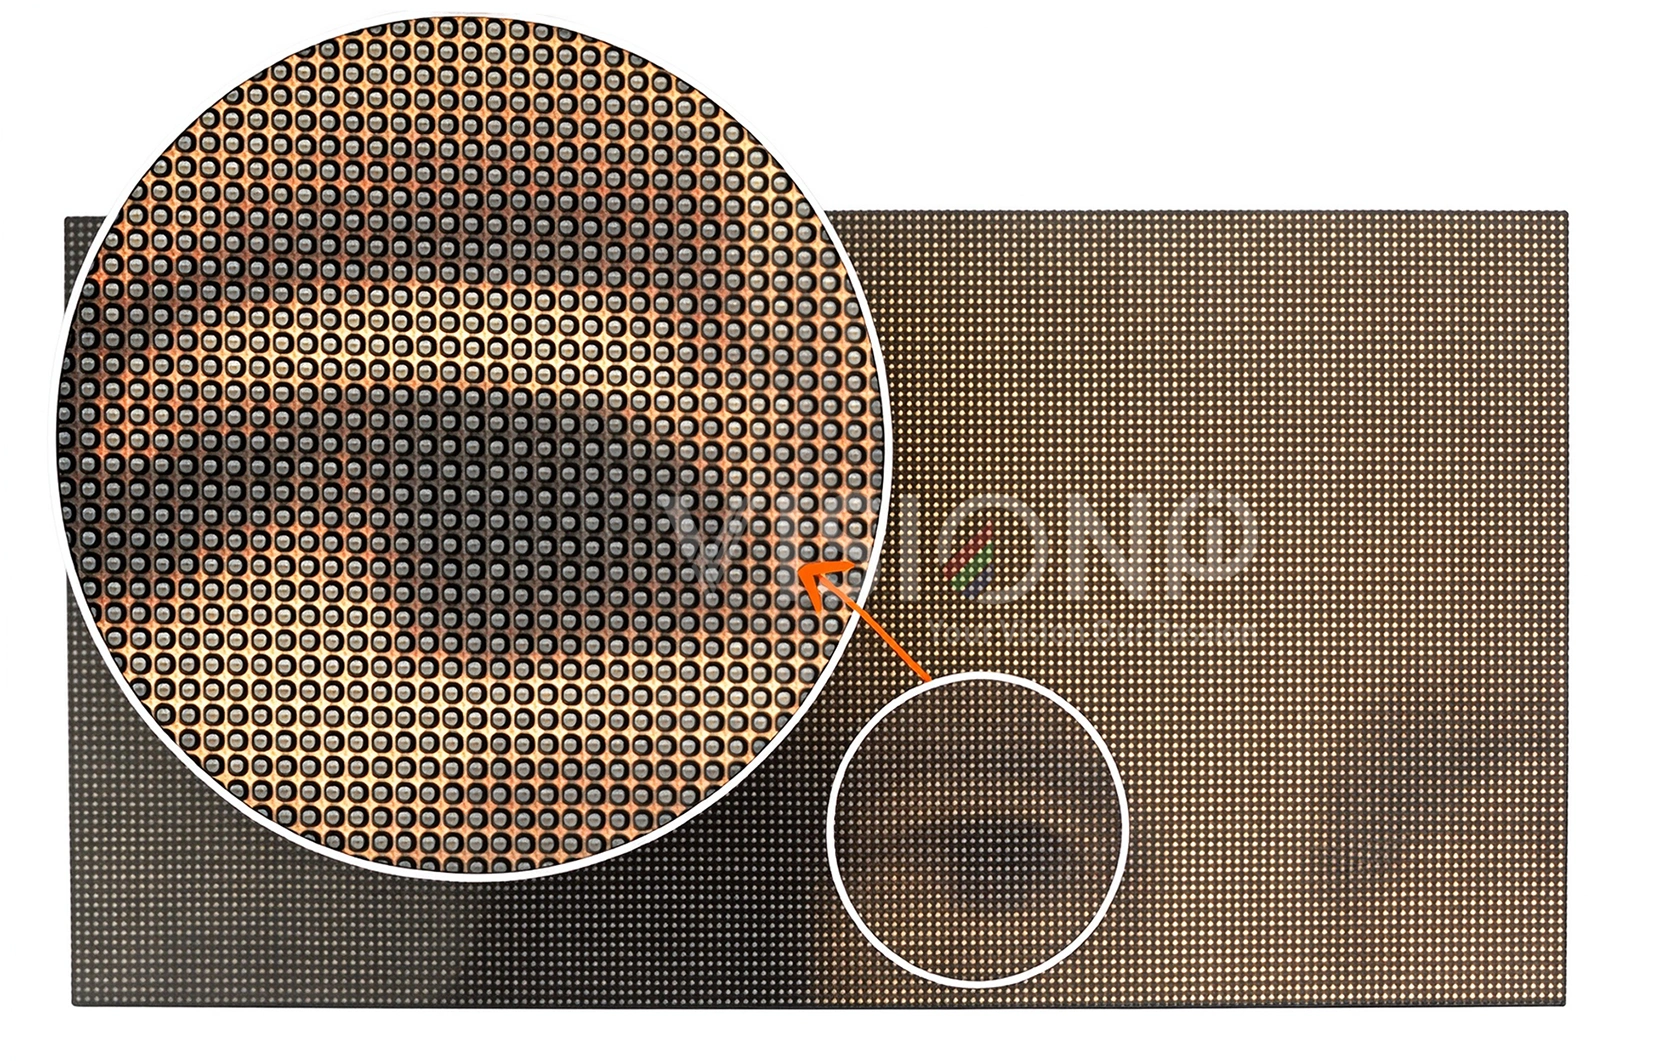
The SMD package is a mature, well-established LED technology with stable supply chains and moderate cost, offering high flexibility for graphic customisation. Artistic effects are normally realised by printing textures on perforated masks.

Its drawbacks are also evident: the mask and texture layer partially block light output. Constrained by the discrete lamp bead packaging structure, its surface protection and long-term reliability are limited, and ultra-fine pixel pitches are difficult to achieve. The optimised SMD solution adopts custom high-toughness masks paired with low-scan, high-brightness modules to minimise the optical impact of the mask. The minimum pitch available under this scheme is P1.8.

smd mask type textured led display modules

GOB Textured LED Screen: Enhanced Protection with Inherent Process Limitations

GOB technology applies a layer of transparent optical potting compound over assembled SMD modules. Artistic textures are implemented either by surface lamination or direct printing. After potting, the screen gains substantially improved impact resistance and dustproof performance. The lamination process also facilitates consistent texture presentation in power-off state.

Still, the potting layer creates trade-offs between heat dissipation and optical performance. The compound impedes thermal dissipation, bringing potential long-term risks including film delamination and optical attenuation. The composite structure of glue plus film also compromises light transmittance and colour rendering when the screen is active.

There are two mainstream implementation routes for GOB art screens. The first is direct UV printing on cured GOB adhesive. Its critical downside is that once a module fails and requires repair, the adhesive together with the printed pattern will be destroyed, and the texture cannot be restored after maintenance. The second route adopts printing with optical inks. These specially formulated inks feature high light transmittance, excellent colour rendering and anti-ageing properties. Applied via precision printing, they maintain clear image output and long-term colour stability.

COB Textured LED Screen: Premium Fine-Pitch Option Balancing Image Quality and Protection

COB mounts LED chips directly onto the PCB substrate, delivering higher integration and outstanding advantages for fine-pitch, close-view applications. Free of discrete lamp beads and bonding wires, COB boasts superior structural integrity, with better resistance to impact, dust, and moisture, as well as higher long-term operational stability. For art screen applications, COB pairs with custom textured masks where patterns are embedded inside the mask substrate. It preserves superior close-view image quality while enabling repairability without ruining the decorative texture. This makes it ideal for high-end exhibition halls, luxury residences, home theaters, and premium projects.

Flexible COB Textured LED Screen

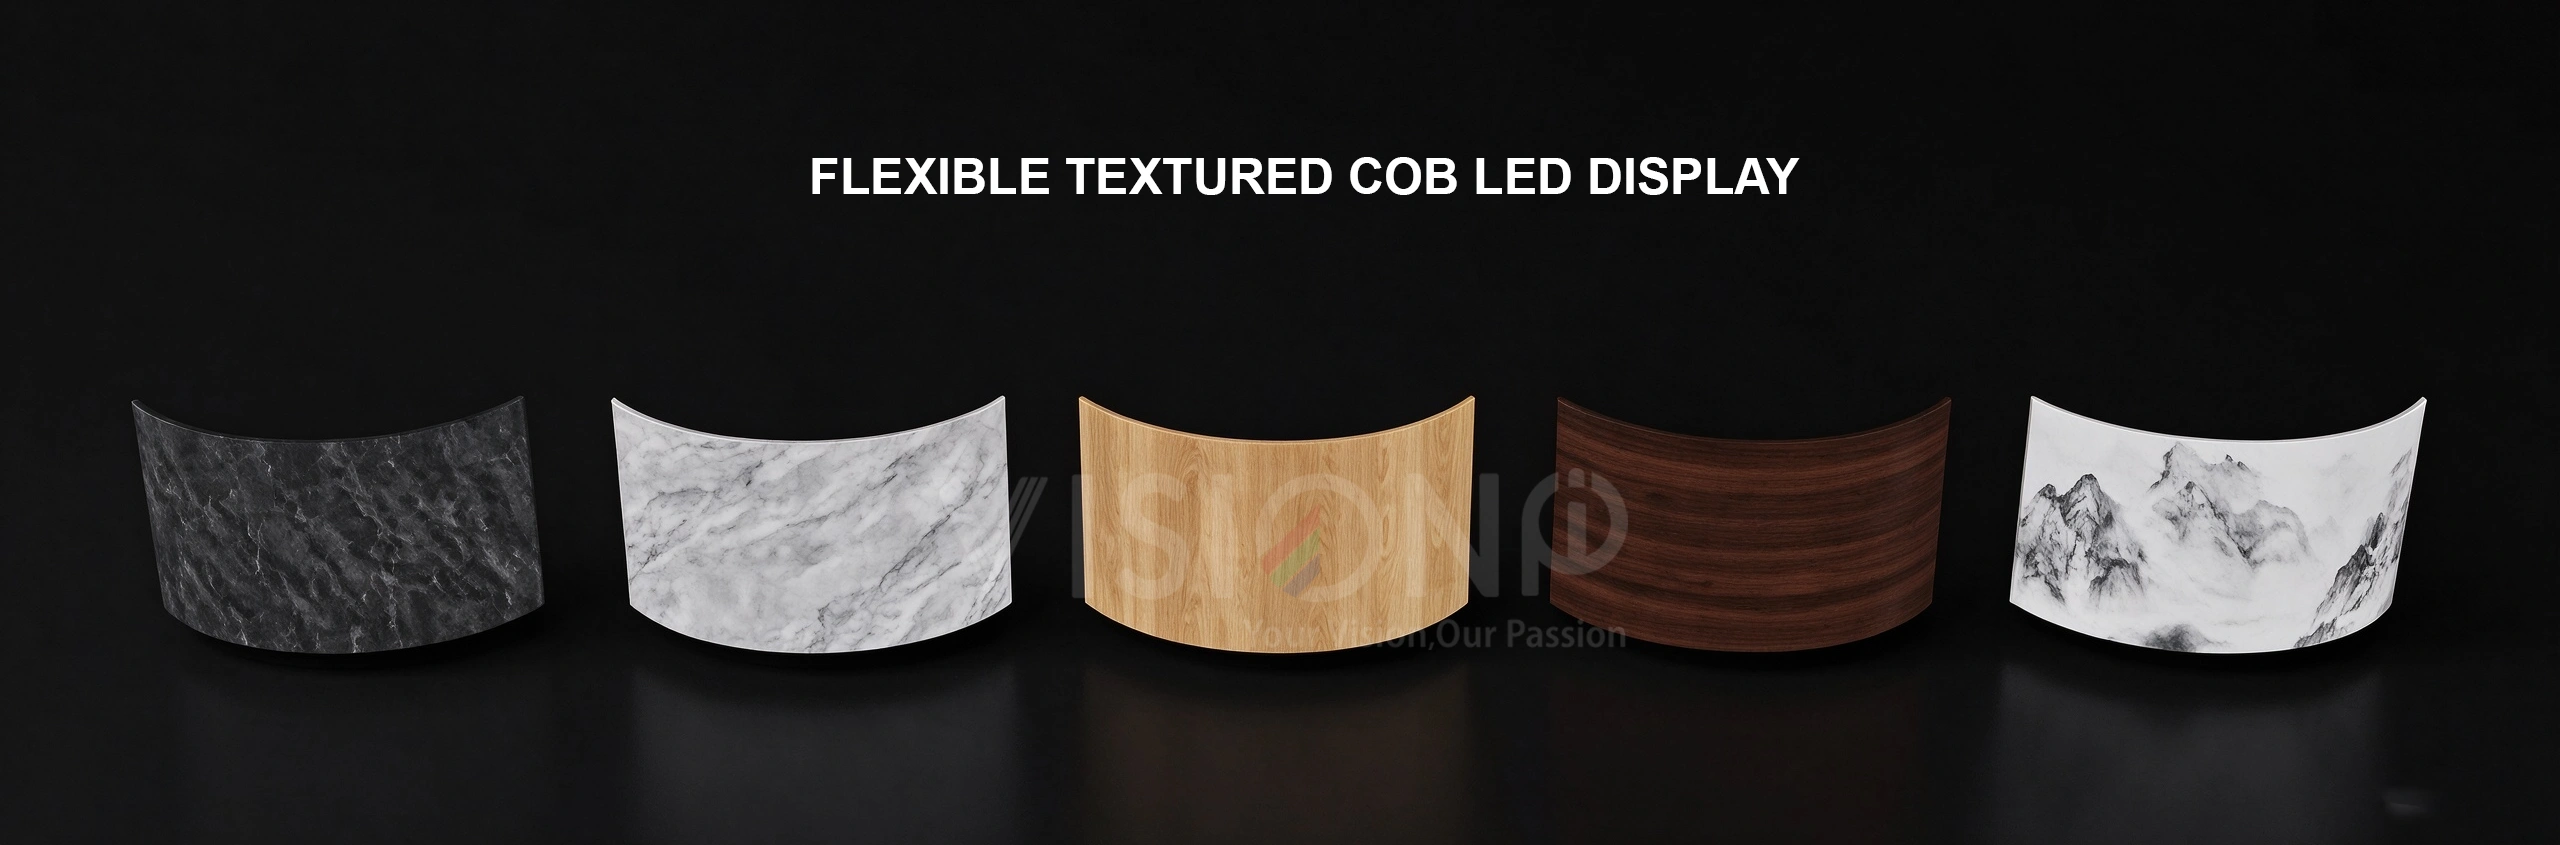
Beyond flat COB textured panels, we also offer flexible soft modules that can form both inward and outward curves. Whether you need a gentle arc, flowing curve, or unique sculptural form, the customizable textured surface blends perfectly into your space. Turn ordinary display walls into eye-catching, integrated art installations.

FLEXIBLE COB LED TILES TEXTURED MARBLE WOOD

VISIONPI Art Texture Screen:  Five Core Technologies

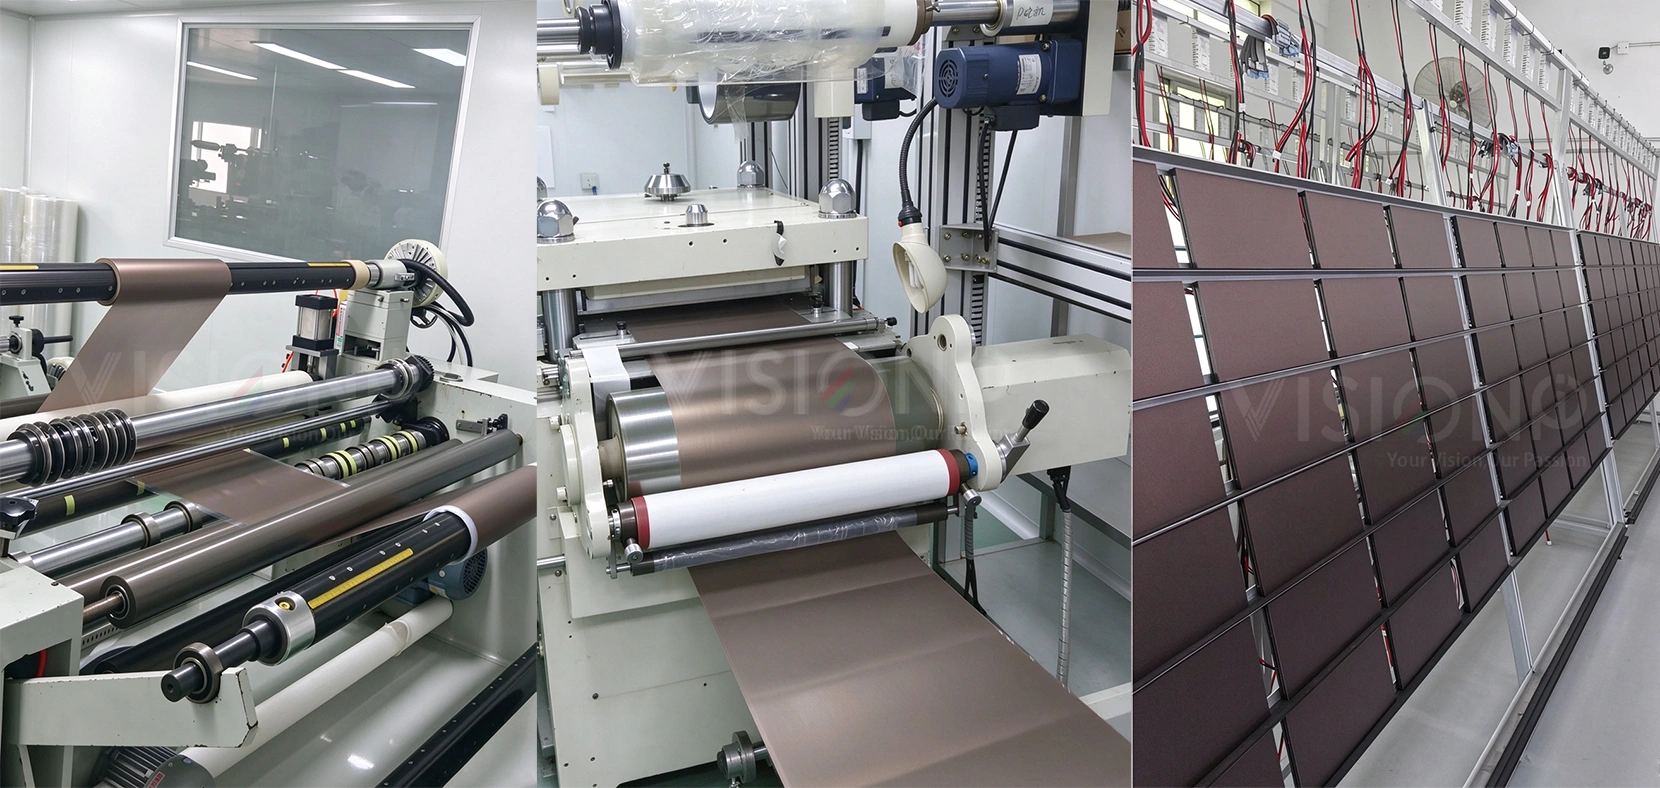
VISIONPI Art texture screens are manufactured through five core processes: texture design, master plate fabrication, texture printing, precision slitting, and full optical lamination. Supported by a proprietary optical ink system, the product supports stable mass customization of wood grain, marble, fabric, metal, and aluminum composite panel finishes. It achieves the core value: integrated artistic texture when off and a high-definition intelligent display when active.

cob art marble textured led display screen

1. Texture Design: Eliminate Splicing Discontinuity at the Source

Unlike simple surface mapping used on generic display panels, texture development is carried out based on the full wall layout. During design, grain orientation, depth hierarchy, and light-shadow rhythm are defined in advance, aligned with module arrangement rules. This avoids misaligned seams, broken texture continuity, and repetitive visual patterns, delivering a monolithic surface effect after installation.

Optical parameter calibration is completed concurrently to balance texture delicacy and light transmittance. The decorative aesthetic in the power-off state is retained without sacrificing brightness or color accuracy in operation, reconciling ornamental value and display performance.

textured led display manufacturing process

2. Master Plate Fabrication: Standardized Quality for Batch Production

Once the design is finalized, nanoimprint lithography is used to produce dedicated optical master plates that accurately replicate three-dimensional relief textures of natural materials. Texture density, relief depth, gloss, and fine details are standardized by the master plate. This eliminates batch-to-batch inconsistencies such as color deviation, grain distortion, and uneven texture, ensuring uniform quality and reliable large-volume delivery.

3. Texture Printing: Optical Ink for High Transmittance and Durability

Low-end textured products commonly use conventional spray painting or adhesive film lamination, which tend to suffer from poor light transmission, hazy images, and color fading over time. VISIONPI utilizes precision texture printing with proprietary optical inks on high-transmittance PET optical base films to form relief patterns and color layers. The dedicated ink delivers high transmittance, high color fidelity, and anti-ageing performance. The coating adheres uniformly and stably, resisting yellowing and fading over extended service life. It faithfully replicates natural material textures without obstructing light emission from LEDs, preventing mottling or uneven transmission and sustaining clear, pure imagery.

4. Precision Slitting: Micron-level Dimensional Matching

Rolls of printed optical film are cut to module dimensions on CNC equipment with micron-scale precision. Dimensional tolerances are tightly controlled; sheets with edge defects, burrs or deformation are screened out. Uniform, neatly trimmed sheets provide the prerequisite for seamless lamination, reducing subsequent risks of delamination, offset and uneven gaps.

5. Optical Full Lamination: Dual Module Routes for Diversified Scenarios

Automatic vacuum optical full lamination eliminates trapped bubbles and wrinkles, bonding the texture film tightly to the module for a smooth, integrated finish. Two mature options are available to match different project positioning:

  • GOB Module Lamination (Mainstream Mass-Production Option): Cost-competitive with comprehensive dustproof, impact-resistant and moisture-proof performance. Suitable for most exhibition halls, offices and commercial fit-outs, supporting fast standard delivery.
  • COB Module Lamination (Premium Custom Option): Higher in cost, yet delivering superior brightness, finer image details and lower failure rates for continuous long-hour operation. Preferred for corporate headquarters, exclusive clubs, government and enterprise landmark projects.
marble textured led display in store showcase wall

SMD, GOB, and COB are three mainstream technical routes for LED art texture screens. COB stands out as the optimal solution. It delivers superior inherent stability. Even with surface texture treatment, it can maintain 800-nit brightness. When powered on, it minimizes visual interference from the surface texture. Most importantly, it supports later maintenance without damaging the decorative texture. We specialize in custom COB LED display solutions.

Contact us for a project consultation and quotation!

Long Louver Outdoor LED Display

LED modules Louver and masks

In most LED modules, the Louver (also called masks) is the final installed component. This louver structure, fixed after the basic assembly of the module, is critical for measuring the off-state brightness performance.

Less direct sunlight reflection correlates with higher overall contrast. Outdoor installations are exposed to sunlight for most of the day, necessitating rigorous louver design to ensure optimal display performance. The design process requires balancing contrast and viewing angles

LED display louver : improves performance and life.

  • Full Protection
  • The high led modules mask can protect LED lamp beads from dust, water, and other debris as a bodyguard of your display.
  • Anti-Glare Design
  • Special coatings greatly reduce on-screen reflections, making it easy to enjoy in bright outdoor conditions.
  • Weather Resistance
  • Constructed from waterproof and protective materials, the mask allows users to use their display in outdoor conditions ranging from heavy rain to bright sunshine.
led louver 5mm vs 3.5mm

Enhanced Visual Quality

 A matte surface scatters ambient light via diffuse reflection, resulting in a darker off-state and improved contrast uniformity across viewing angles. In contrast, a polished coating appears dimmer at the light incident angle, theoretically offering higher contrast, but causes severe glare at reflection angles, impairing side-angle viewing

Matte surfaces on louvers are typically achieved through coating processes. Most manufacturers apply anti-reflective, UV-resistant black paint to minimize light reflection

High Louver vs low Louver

long louver high mask vs low louver led display comparision
long louver led display higher contrast ratio outdoor led display
outdoor long louver led display high contrast

Rock Series Features:

  • Die-cast aluminum cabinet and full aluminum-shell LED modules for superior heat dissipation.

  • Ultra-high brightness up to 10,000 nits, ensuring excellent visibility even under direct sunlight.

  • Front and rear service design for easy maintenance and flexible installation.

  • Extended louver design enhances contrast and image clarity.

  • Breather valve system improves stability and ensures long-term reliable operation.

long louver led dispay high contrast 6.15mm
long louver front service outdoor led display
outdoor high contrast led display

Subscribe To Our Newsletter

Join our mailing list to receive the latest news and updates from our team.

You have Successfully Subscribed!

Pin It on Pinterest